Overview
Today, I’m going to introduce you to how to do test automation and write your very first automated script using Selenium WebDriver with .NET Core.
.NET Core is the latest cross-platform framework for Microsoft that allows you to run the same code on Windows, Mac and Linux.
I’m going to take you through installing Visual Studio, introducing you to the MSTest testing framework, telling you a little bit about Selenium WebDriver on Mac and ending all of that with your very first automated functional test, running on Chrome browser.
So, let’s go!
How to install Video Studio for Mac?
Before we jump into all of the content, I wanted to go ahead and talk about the pre-requisites so that you’re not 100% completely lost as I’m going through this course.
So, there are only two pre-requisites:
- Understanding of programming (mainly c#)
- Mac OS
This actually is a pretty advanced course.
I’m going to be teaching you a bunch of simple concepts, especially related to Selenium WebDriver and .NET Core, but you do need to understand the programming because I’m not going to be teaching you any of that.
Also, along the lines, we’re going to be using .NET Core, which is the latest Microsoft framework that allows you to code in C#.
You do need to have a Mac operating system so that you can follow me along step by step in the tutorial.
You can also do this in Windows using their version of Visual Studio, but the version of Visual Studio in Windows is very different than the version of Microsoft Visual Studio for Mac.
Although you can do it in Windows, it’ll be much easier for you to do everything if you have a Mac.
You can get all the code that I am going to use on this course right here.
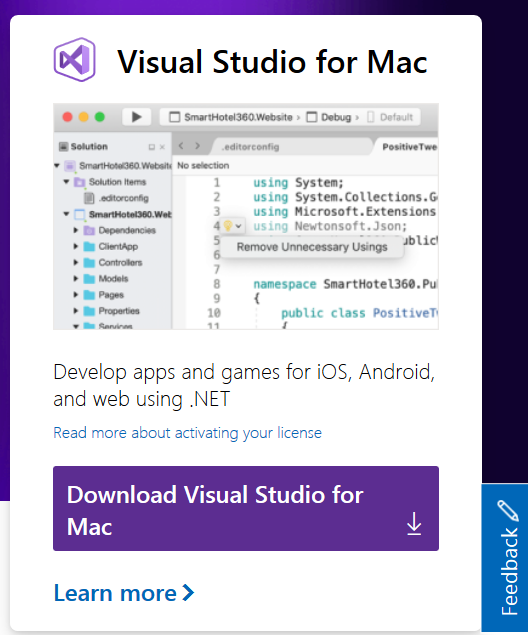
How to download Visual Studio for Mac?
Now, let’s go ahead and download Visual Studio for Mac.
There’s actually a free edition called Visual Studio Community for Mac and you can get it at this URL.
We’re going to go and click download Visual Studio for Mac.
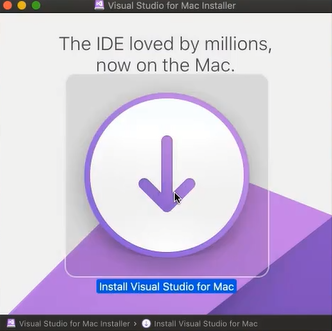
We see that we have the download file here. We’re going to go ahead and open it.
Now, we’re going to install it by double-clicking on this install Visual Studio for Mac icon.
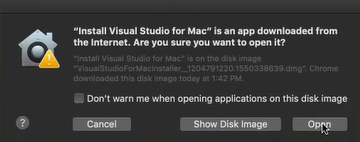
We’re going to say open, this is okay. Ignore that warning.
Click the continue button.
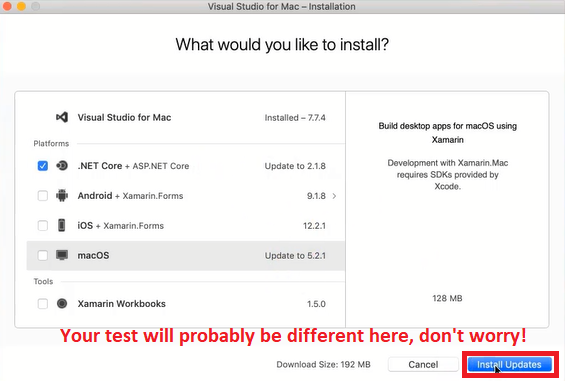
Now, we get many options to install different workloads for Visual Studio.
If you’re going to be doing any kind of mobile development, Xamarin is a pretty awesome cross-platform mobile development tool. But here, what we’re really interested in is .Net Core.
So we’re going to uncheck everything else.
.Net Core, by the way, it’s a cross-platform compiler that works on Windows, Mac, and Linux.
Before, it used to be .Net framework that only used to run on Windows.
Now, we have .Net Core where you can write the same code and have it run on all the platforms at the same time.
It’s pretty fantastic!
Pretty similar to Java, I would say, except much more eloquent.
For me, since I already have Visual Studio installed, I have “Install Updates”.
For you, you’re going to have an installation, so your text here will be different, so you’re just gonna go ahead and install .Net Core.
Once that’s finished, I will see you back here to talk further.
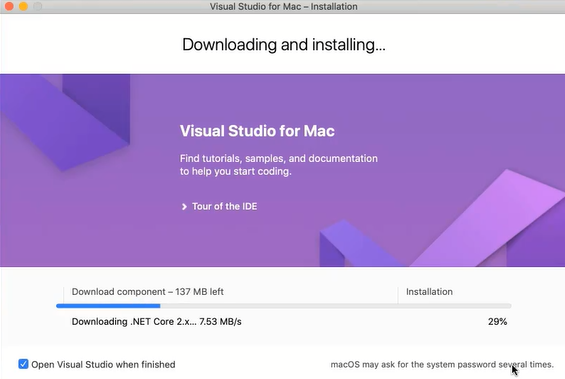
It will ask you for your password so go ahead and enter your password.
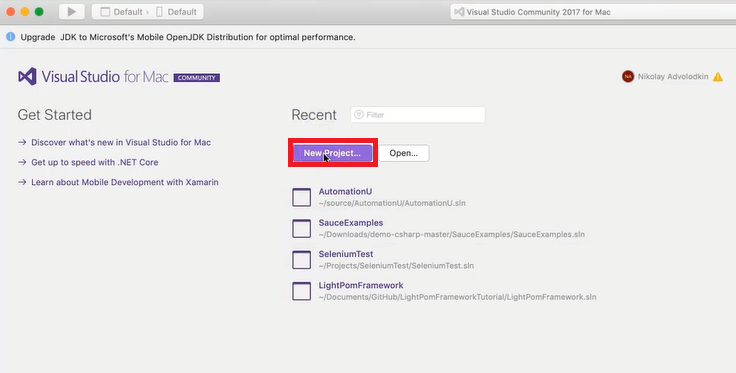
All right. So here it is, Visual Studio Community Edition for Mac!
Let’s go ahead and get started and I’ll take you through some parts of it as we go through.

Getting started in Visual Studio for Mac
Now, this isn’t meant to be an in-depth course about Visual Studio or all of its tips and tricks.
This is meant to simply help you get started, with Selenium WebDriver as fast as possible, with .Net Core.
I’m only going to cover the basics, just enough to get you to the start, and then, of course, you can continue to expand your skills.
What we’re going to do here is “Start a new project”.
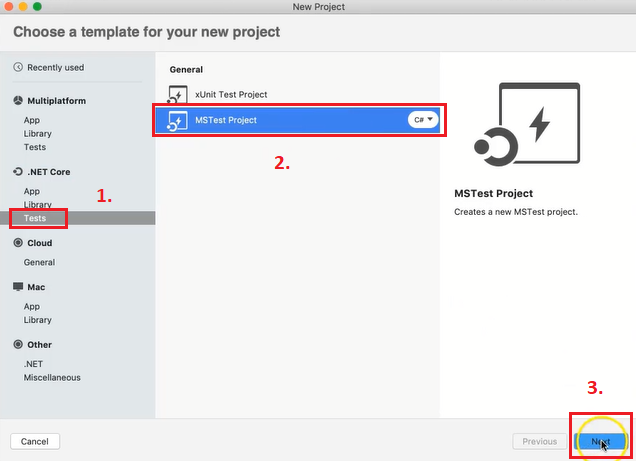
How to create an MS Test?
Here are a bunch of projects that you can pick from, depending on your needs, but for us, what we really want to do is start an MS test .Net Core project, which is in my recently used.
Since you’re freshly installed:
1. You can come here to .Net Core, click “tests”;
2. Select an “MS Test Project” ;
3. Finally, you’re going to click “Next”.
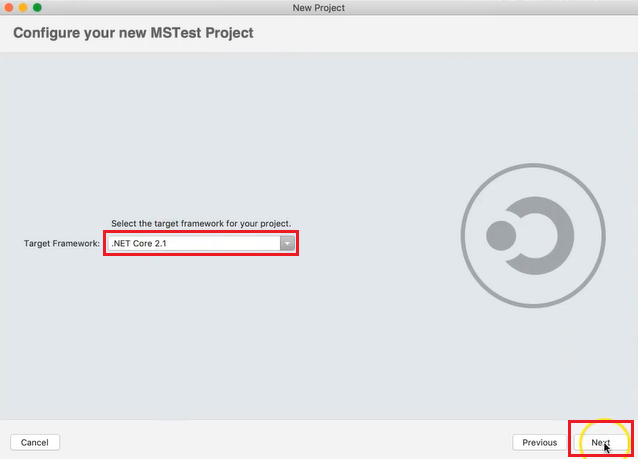
You can choose your target framework.
We want to use the latest, .Net Core 2.1.
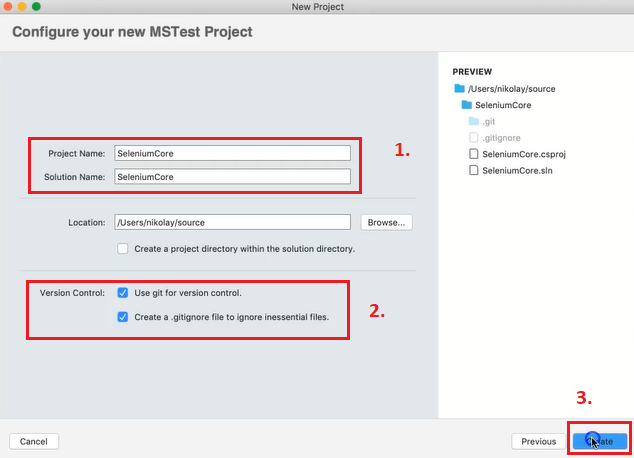
Then, you will:
- Give this project a name;
- I do want to use Git for version control. So we’re also going to instantiate it with a .gitignore file too, automatically ignore all the non-essential files that come along with a Visual Studio project;
- Then, click “Create”
What you can see here is a Visual Studio code opened up with a class that we have.
This automatically created a class for us, using a template, and on the left-hand side, we can see:
- The solution explorer. This is where everything is going to go, that we add, different kinds of files and folders. Everything will be stored in the solution explorer.
- If you come to the top, we can see multiple different options that we can use to pull up different kinds of menus.
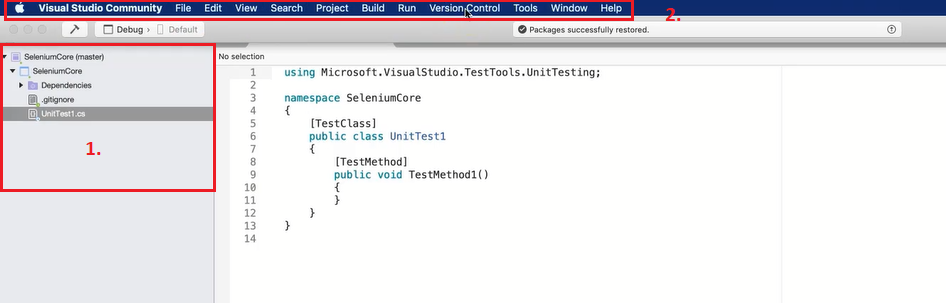
So for example, one of our very useful menus is going to be “code view”.
We’re also going to have a “test view”.
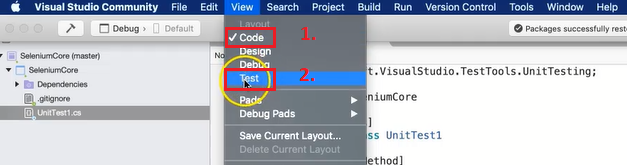
Once we actually write some tests, we’re going to have this test pane that comes up and we’re going to be able to execute all of our tests, like this, simply by pressing the run all button.

So if I press that now, what we have done is executed some tests and based on that, they’re going to get a status here.
That’s pretty much it.
What’s the most important right now. Let’s go ahead and proceed with the rest of the course so that we can get you started running tests in Selenium WebDriver and .Net Core.
Introduction to MS Test
In just a few minutes, we’re going to jump into Visual Studio IDE for Mac and actually start writing some tests, start automating some browsers.
Before we do that, I have to lay some foundational knowledge on you, especially about MS Test, a unit testing framework provided to us by Microsoft.
A unit testing framework is basically an easy way for us to be able to combine a bunch of methods and classes into multiple operations and execute them as tests.
These frameworks provide amazing things:
- You are able to perform assertions.
- Allows you to data drive your tests.
- There is the possibility of categorizing and grouping your tests.
- Makes test execution and automating your tests extremely easy.
MS Test
MS Test is a framework that’s provided to us by Visual Studio automatically.
Whenever we download it, it’s in there.
It’s out of the box, really fast and very user-friendly.
Microsoft has been doing a lot of work on it and this framework is becoming extremely amazing.
There are other third-party frameworks out there, such as NUnit, which is also very popular. You may want to check that out.
Also, MS Test framework is very similar to other unit testing frameworks.
Those are if you’re familiar with other programming languages, JUnit, Mocha or Espresso.
What are Attributes?
One of the most important things about old testing frameworks, but specifically about MS Test, is that they provide us attributes.
Attributes are a way to tell the compiler about what is going on with your code.
As you can see here, we have a standard unit test.
A unit test lives inside a public class and that class is tagged with an attribute known as a TestClass.
That’s what’s there inside of those brackets
That’s an MS Test attribute that tells the compiler that here we have a TestClass.
It’s not a regular class, but a TestClass that can be executed and provide some kind of a result.
Inside of our TestClass, we have TestMethod. A TestMethod tell the compiler that we have a method that’s going to be executed basically as a test.
All of our actions such as interacting with selenium, interacting with browsers, doing assertions, go inside over the TestMethod.
Ultimately, whenever the TestMethod passes or fails, we’re going to get a result. All TestMethods need to be public and they need to be void.
This course is not meant to be a comprehensive course in Ms Test.
If you want to learn more, there are plenty of other resources.
I’ve provided here a bunch of other attributes that are provided to us from MS Test from Microsoft.
As you can see, there are many different options and many different attributes that we can add.
Options that allow us to data drive our test. They allow us to clean up and tear down our test data.
In the end, there are so many other options.
What are Assertions?
The other really important part about MS Test is the assertions.
That’s where all the power comes from that allows us to basically validate that an object is in some specific state. Or, if an object matches to another object.
Or rather, any kind of validation that we’re trying to do, we do that through assertions.
As you can see, there are many different kinds of assertions.
We can check if one plus one equals two. We can check if an element exists on a page.
Again, there are many different methods. This is not a comprehensive course on MS Test, but just know that these assertions basically are a key part of all of our tests.
As we start digging into the code, you will see us using these assertions to be able to set a pass or fail state for all of our test methods.
Selenium WebDriver overview
All right. Now, we’ve gotta cover one more topic before we start coding.
I know, I know, be patient.
We’re going to get to write and run our first automated Selenium test. But first, we’ve gotta lay the foundation. We’ve gotta talk about, what exactly is Selenium.
Introduction to Selenium WebDriver
So, in this specific section, what you’re going to learn is a little of the history of Selenium.
Then, you’re going to understand that the Selenium WebDriver protocol and how it works.
Next, I’m going to teach you about the Selenium Script.
And then, finally, we’re going to talk about all the common Selenium commands that you can use.
Now, this isn’t meant to be a very comprehensive course in Selenium, right?
This is a getting started, introduction to Selenium WebDriver course. And so, the goal is to get you up and running as soon as possible.
People actually make careers, such as myself, doing test automation and using Selenium every single day.
There are actually courses out there that are hours and hours that cover this topic. And that will not be the case.
But I promise I’ll give you enough information so that you can proceed comfortably and then I’ll leave you with a bunch of resources to further expand your knowledge.
History of Selenium
Selenium was actually started back in 2004 by Jason Huggins at ThoughtWorks, such a long time ago, right?

The idea behind Selenium was that we needed a way to simulate user actions in our browser so that we can test.
We had unit tests, we had API tests … but we had no way of simulating browser rendering and browser interactions with our web applications.
So, Selenium was born.
Selenium has actually gone through many versions already.
Version one was the original one that was created. That was basically interacting with the browser, with JavaScript.
It had lots of problems because JavaScript is asynchronous. It’s really hard to sync the browser with random JavaScript commands.
In version two, Selenium introduced more object-oriented programming concepts. You could create stuff like pay jobs, you could have elements that contain a bunch of different locators.
That made the use of Selenium much easier. Also, they introduced JSON Wire Protocol. Instead of talking to through JavaScript, it was using HTTP requests, and I’ll cover that in a little bit.

Version three is the current version as of this date of Selenium.
This version basically removed Selenium RC, which is no longer really used, as we used to call Selenium Remote Control.
There are some API changes that improved the functionality of Selenium. This is the version that we’re going to be using this course.
Selenium and the WebDriver Protocol
In hopefully a not too distant future, Selenium 4 is coming.
Selenium 4 is going to bring with it the W3C protocol.
What the means is that Selenium is going to be a W3C standard and every browser now should support the Selenium API out of the box.
So, the problem with Selenium currently, up to version three, is that the Selenium community works on implementing their API on browsers.
However, they don’t have full internal knowledge of how the browsers operate. There are always a lot of problems that arise from that.
The beauty of integrating Selenium with the W3C protocol is that now the browser vendor such as Safari, Chrome, Firefox, will need to implement the Selenium API.
For example, if you want to do a browser click or we want to refresh your browser. Or, if we want to wait for a page to be loaded, the browser vendor will be responsible for making that implementation.
It will be a W3C recommendation, so it’ll kind of be a standard that every browser should follow.
That’s beautiful because now our Selenium code is going to be much faster.
It’s going to be much more stable and it will allow browser automation to evolve.
What is Selenium Webdriver?
Selenium project actually has many different tools.
For example Selenium RC, which I already mentioned, Selenium IDE which actually used to exist but then it died, it was a record and replay tool.
We all know how record and replay tools are not the best.
Now, Selenium IDE is actually being brought back by Applitools and Dave Hefner.
They’re trying to make Selenium IDE awesome and more user-friendly.
However, the ultimate Selenium tool is Selenium WebDriver!
That’s exactly what we’re going to be using in this course and that’s exactly what’s used by most the world in order to be able to interact with the browsers.
All Selenium WebDriver is, is a language-specific API that allows us to use a programming language to communicate to a Selenium server that will talk to the browser and allow this to go back and forth.
What are the Selenium Webdriver Language Bindings?
Selenium WebDriver actually supports multiple language bindings, such as Java C#, Ruby, Python, and JavaScript.
Those are the ones officially supported.

There are a bunch of other ones that exist out on the web, but I don’t recommend you to use them.
The beauty of all these languages being supported is that if you’re comfortable coding in any of them, you simply have to learn the Selenium WebDriver API.
This is not so complicated, and once you learn it, you can start writing automated functional tests.
Really awesome!
The way the Selenium WebDriver protocol actually works is…

- You start with your Selenium code.
- The Selenium code makes an HTTP request to the Selenium server, which is the Selenium WebDriver.
- That will then send a JSON WebDriver request to the browser.
- The browser will respond back with a WebDriver response.
- Then that will all go all the way back to the code, and they talk back and forth.
It’s basically just a little HTTP server that allows communication between our code written in one of those five language bindings and the browser.
The Selenium Project
The Selenium Project is an opensource project.
It’s supported by members that don’t get paid. They’re always looking for support.
If you want to contribute, there are multiple different ways to contribute. You can get involved clicking here.
Also, if you even want to help, you can go to the Slack channel or the IRC channel.
In those channels, you can come and ask questions and the maintainers of Selenium are there and can help you to answer them.
What are the Seven Actions Of A Selenium Script?
A Selenium Script really boils down to seven actions.

The very first action is you need to instantiate a WebDriver.
This basically allows you to interact with some kind of browser that you want.
The next step is, you have to open up a webpage.
After you open up a webpage you want to identify some elements that you want to interact with.
Then, you need to ensure if that element and the page are in the state that you want them to be in, before interacting.
Once you figure out it’s in the right state, then you perform an action on that element, then you get some kind of a result.
Here is where you perform your assertion using that assert class from MS Test.
Finally, you clean up and close the browser
1-Start the session
So, the very first action is creating an object that allows you to interface with one of the browsers.
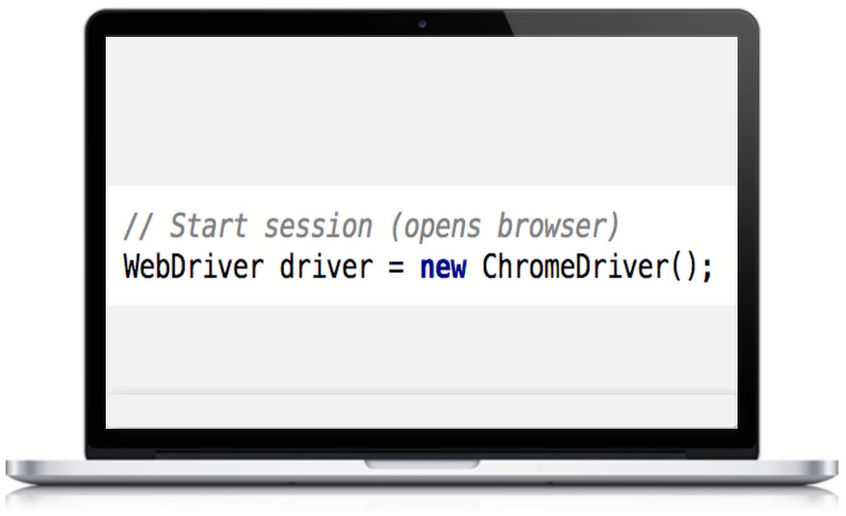
There are multiple different drivers. You can have a Chrome driver, a Safari driver, an Edge driver … each of those allow you to communicate with the appropriate browser.
The very first step is you instantiate that object that will allow you to talk to that specific browser.

After you instantiated that object, the second step is to navigate to some specific URL.
3-Locate the Element
The third step is locating an element that you want to interact with.
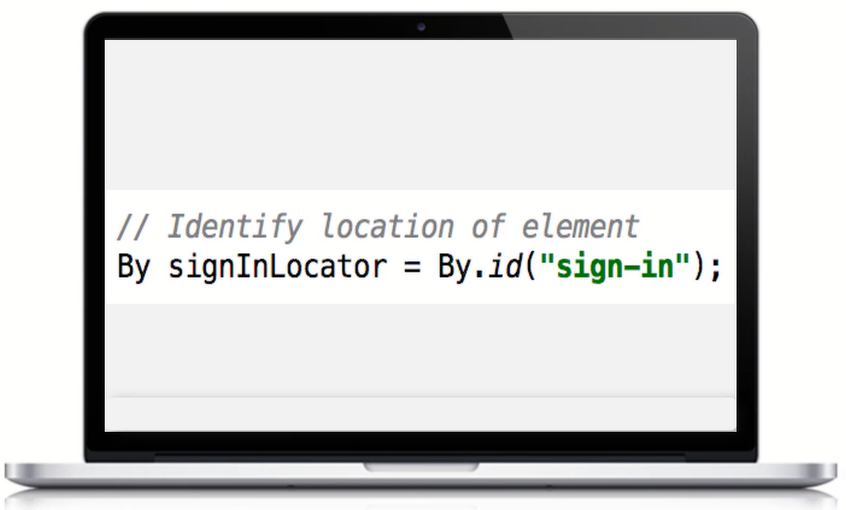
In this case, we are using the Selenium by class and we’re locating an element using an ID.
4-Ensure the Browser is in the Correct State
After we’ve located our element, we actually want to make sure that the element is in a correct state before interacting with it.
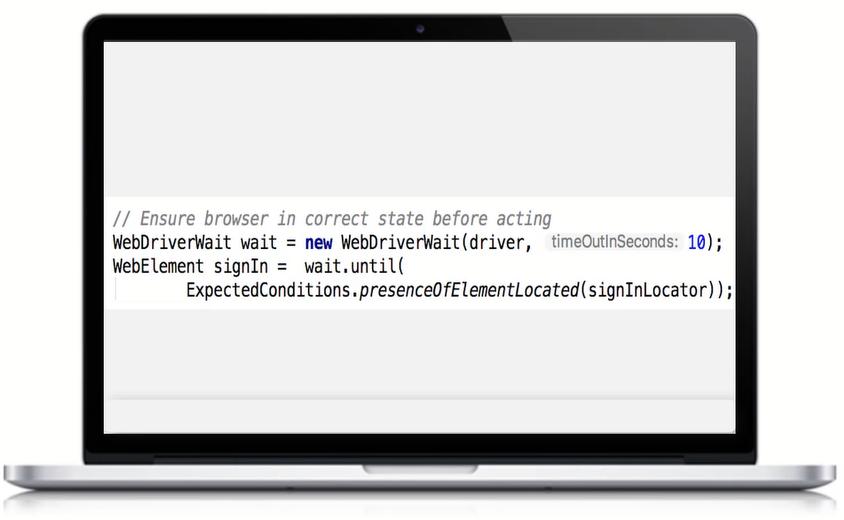
In this case, we’re using the Selenium WebDriver wait, to wait until a specific condition.
In this example, the expected condition that we’re waiting for is that the element is present on the page, and once we’ve figured out that it is, at that point we can proceed with the rest of our actions. Interact with that element.
5-Perform Action
In this case. we can interact with that element, now that we know it’s present.
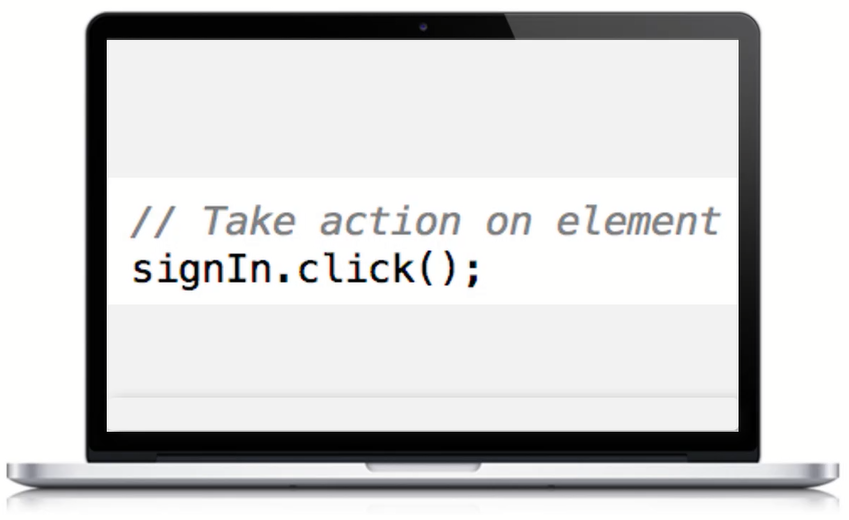
We can perform an action such as a click.
6-Obtain and Record Result
After we’ve interacted with some elements, at the end of the day, this is an automated test that’s meant to represent some kind of end-user scenario.
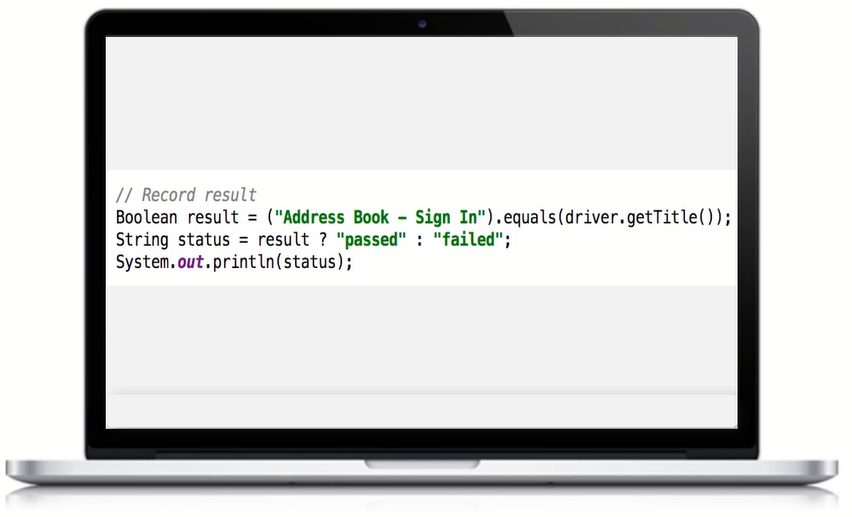
We want to assert that some condition is true or false.
So, we can retrieve some results whether it’s checking that an element is present, or checking that some text exists on some page. Or checking that some page was loaded.
At some point, we obtain and record that result.
7-Terminate Session
Finally, we just quit the driver session.

That will close the browser, shut down Selenium WebDriver, and clean everything up.
I know I flew through all of that.
Locating Elements to Test
Let’s dive into a little bit more detail.
Types os Locators
There are multiple types of locators that Selenium provides us.
To find an element on a page, you can use:
- ID
- Name
- CSS
- Class name
- Tag name
- Link text
- Partial link text
- XPath
The DOM
The Document Object Model (DOM) is basically used to find an element on a page.
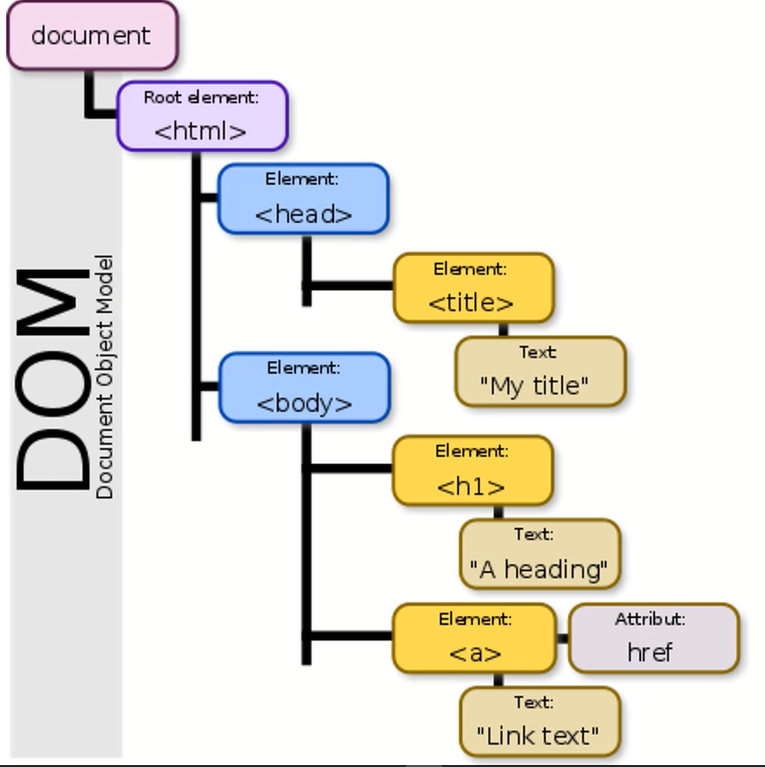
Based on the DOM, you will find an element in some location and you will want to interact with that specific element.
How to use Developer Tools to locate an element?
Normally, you find an element using Developer Tools.
All you have to do is right-click on your browser, open Developer Tools and find that element that you want to interact with.
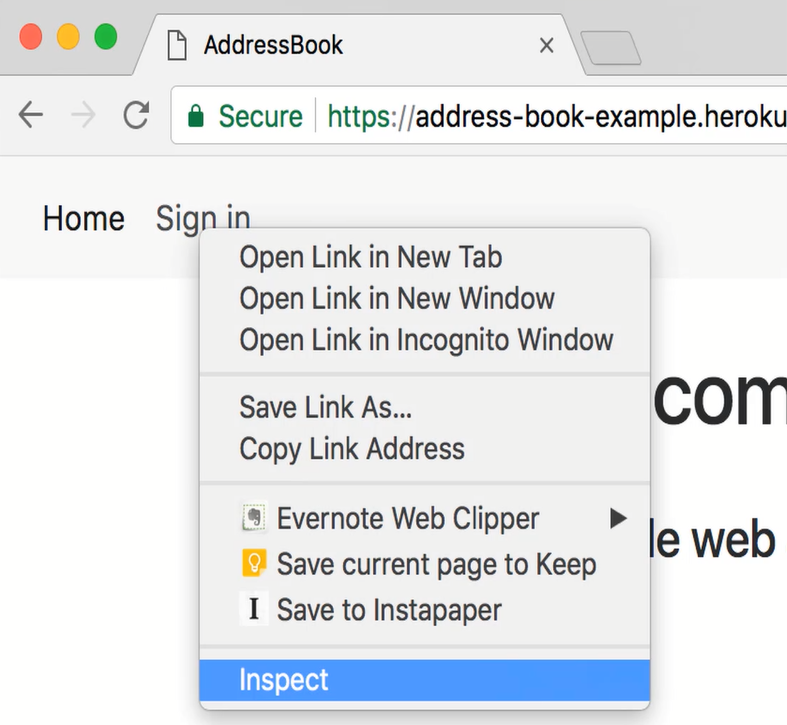
You find a unique element. You want to make sure that the element is the only element on a page that you want to interact with.
How to locate Element with the findElement Method?
Here are some examples in Java of how we can locate elements.
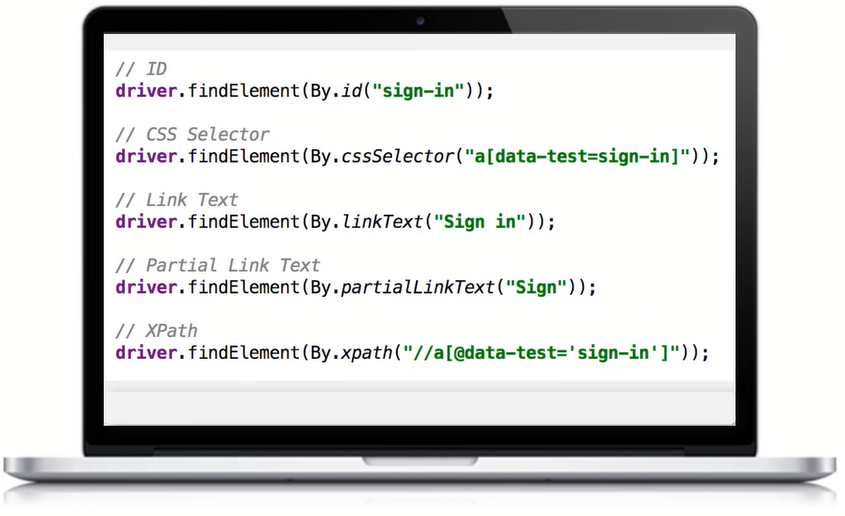
You can see that there are IDs, CSS, partial link text, and so on.
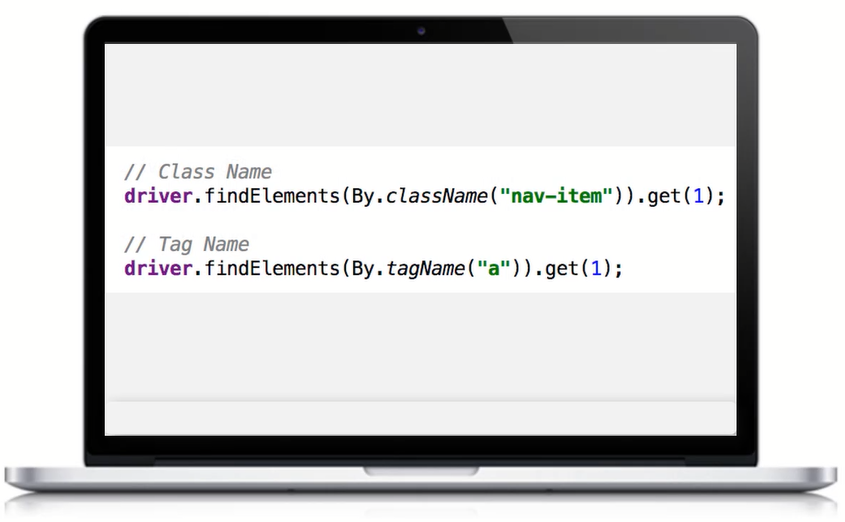
What you see here is we’re using the findElements method, instead of the findElement which was the one from the original page to identify multiple elements.
This will allow us to get back a collection of elements.
How to interact with Selenium Elements?
Once we’ve found an element using the findElement command or findElements, you want to start interacting with elements.
There are some basic actions. There are actually many more than this, but I’m just going to show you a couple.
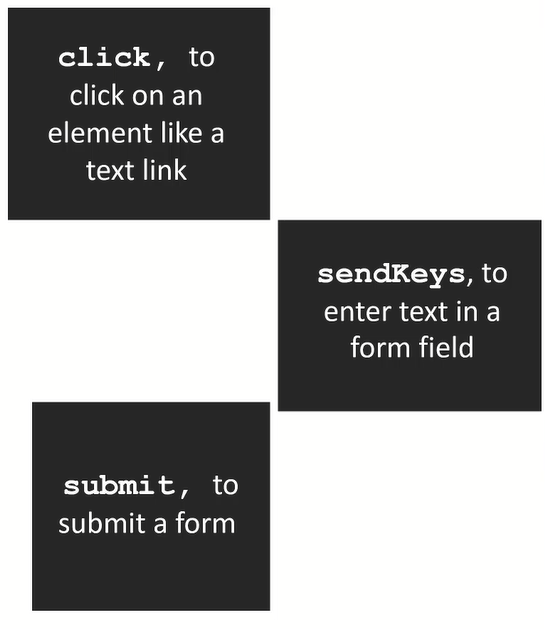
So, you can basically click on an element, you can sendKeys, or you can do something like a submit.
For example, here, you can see we are finding an element and then we are clicking on it.
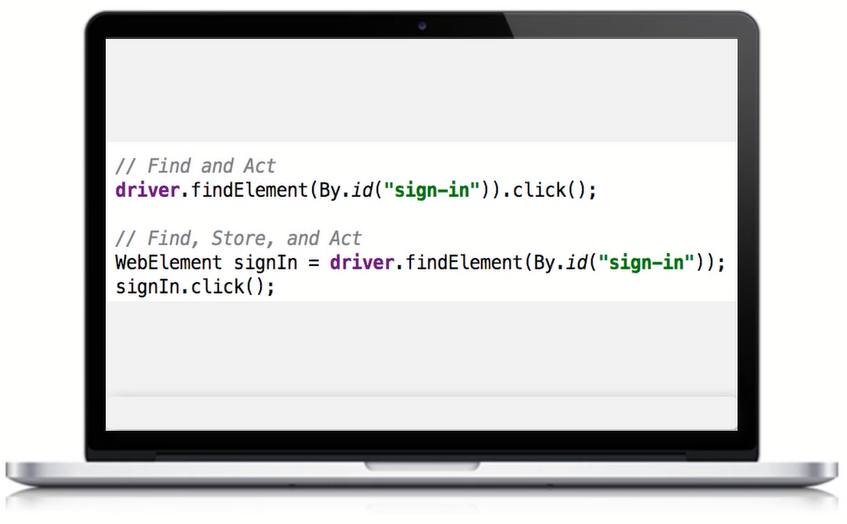
There are two ways to do that, you can find and element and store it in a variable, or you can find an element and interact with it directly.
Here, you can see we’re taking actions on several elements such as clicking, clearing these elements, and sending keys.
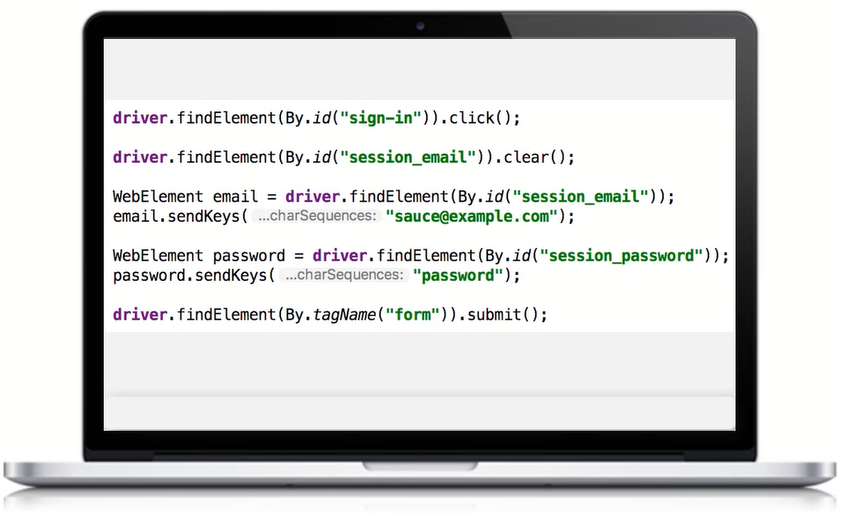
Sending keys will type a string into some kind of a field.
Also, in the last line of code, we’re submitting a form.
Hope you enjoyed the post!
How about that? Did this post help you? Let me know by leaving a comment below.
If you are interested, let’s go and dive into the code, start writing out the first test in our next post. You’ll understand everything as we do that!
I am trying to run my Selenium tests in .Net5 and Chromedriver. However, I keep getting the OpenQA.Selenium.WebDriverException: Cannot start the driver service on http://localhost:55757/. with different port number each time.
I am able to run the tests successfully if I use the Remote web driver.
Is this known issue with Chromedriver with browser 87.0.4280.88 and .Net5/ .NetCorev3.1? Tried the same with the Selenium alpha versions too.
The same tests work with the .NetCorev2.1 though.
Am I missing something in .Net5?
You can check in Task Manager if you have any Chromedriver processes still running (sometimes they are not correctly killed), then run the tests again