Allure TestOps is the full-stack testing platform built on the bedrock of Allure Report. It’s a commercial product and Allure Report is quite widely used in the world and helps people to understand what is happening with the testing results without actually looking into complicated logs and not only really complicated but which are not clear for the people that are not technically savvy. And Allure TestOps will take additional steps to help people understand what is happening with testing.
This is the first post in a series. Today, we’ll go through all the steps needed to set up an Allure TestOps instance to work: integrate with a CI/CD system; run our tests several times; get into launch analytics, results analysis, and test case generation.
Table of Contents
Quick start
Prepare your CI
First of all, we need to prepare the CI/CD side. After that, let’s create a project on the Allure TestOps side and link the project with the CI-system.
Plug-in installation (Jenkins, TeamCity, Bamboo)
So we need to either install the plug-in. We have developed Jenkins, TeamCity, and Bamboo plug-ins.
Usage of allurectl (command line tool) (GitLab, GitHub)
If your CI does not support the plug-ins, then you can use allurectl, which is the command line tool implementing the API of Allure TestOps and this tool will help you to import the test results from the CI system.
Common part
- And the common part of all this will be providing the Allure server URL. It will be a little bit different for plug-in and usage of allurectl, but nevertheless, it’s almost the same.
- You need to provide the ID of a project because Allure runs with the projects and everything runs under the project, so the project is the highest in the hierarchy of the entities in Allure TestOps.
- Then for the completion of the integration, we need to provide a token, which is the security token generated on the Allure side and this token is provided to CI; thus integration is achieved.
- And for a build job we need to provide some tags if needed (but it’s of course needed), because it will provide more information to your job runs or launches on the Allure side, and you will see how it works.
Now starting. On the Allure TestOps side we need to create a project. I’ve already created a project with ID#24, which is the presentation. In our case, the project has some tests and results. In your case, it will be completely empty: no test plans, no test cases, no launches whatsoever.
Now since the project is created, we need to provide some additional information, which is a security token.
We go to profile and create a token. Jenkins integration:
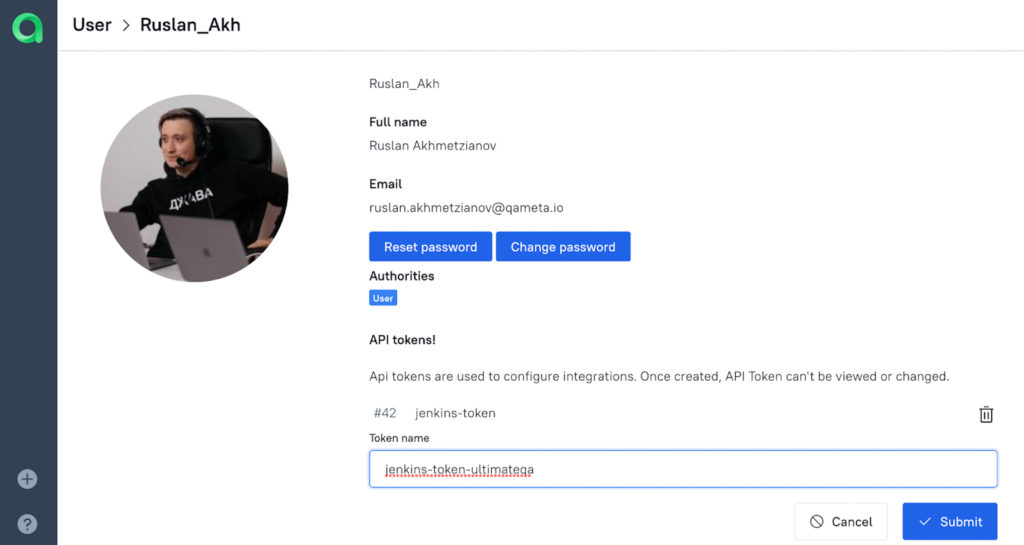
After that, the token for the integration will be generated. Now, we need to copy it and provide it to Jenkins. On the Jenkins side, you will need to install the Allure TestOps plugin and configure it.
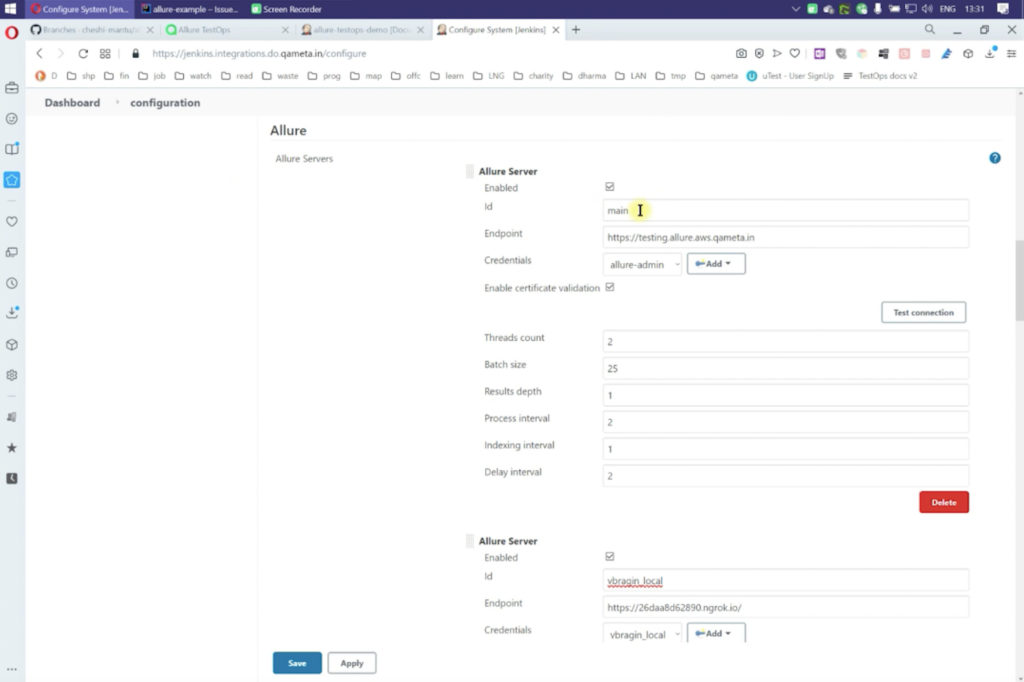
Here are the steps: enable the plugin, provide an ID for this particular server, and there could be several servers, and provide a URL and the credentials.
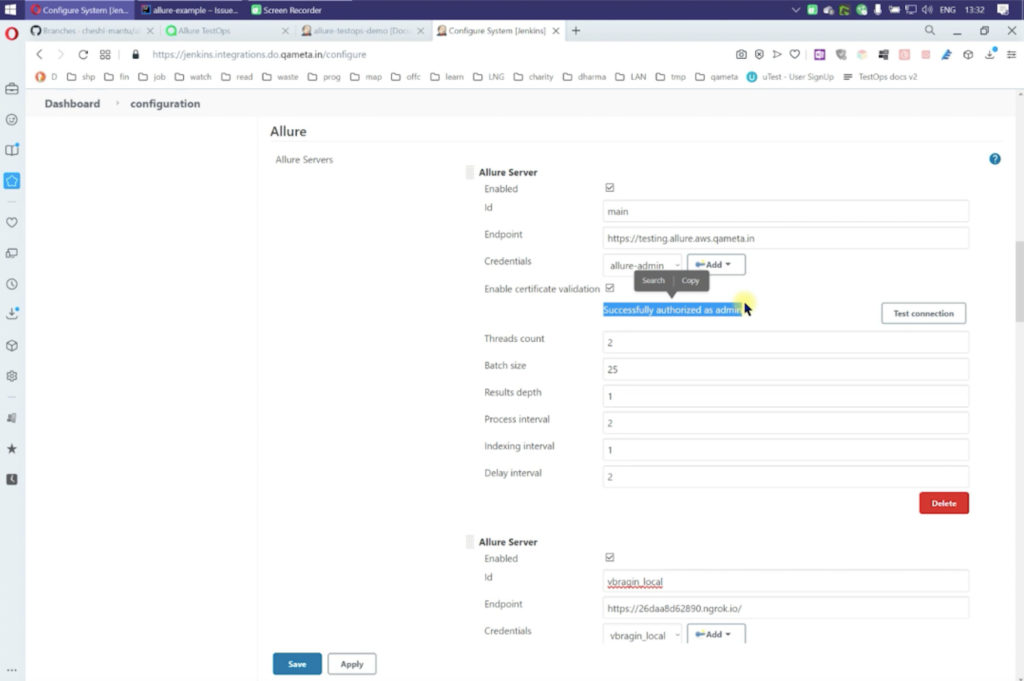
And the credentials are the security token that we’ve generated in the first step. Now, we need to test the connection.
The next step of the configuration on the CI side is linking the project.
Build job’s settings, environment variables
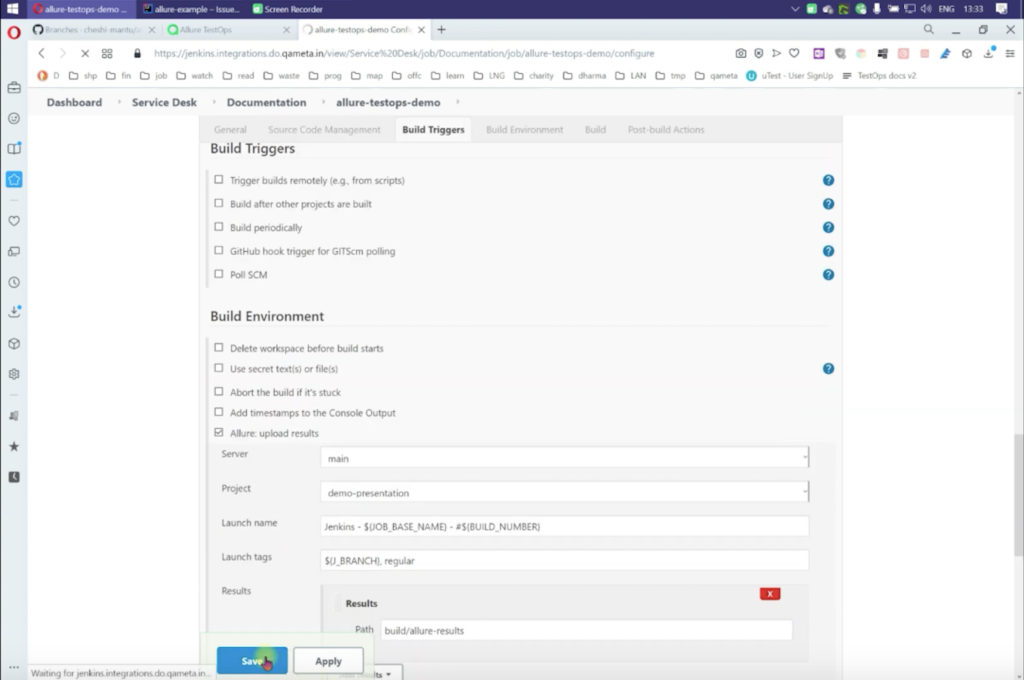
We need to go to the project and configure the integration. We need to enable upload of the test results to the Allure TestOps server, we need to provide the ID of the server.
And then we need to provide the project ID. The project ID is retrieved via the API, so we will use the project names. Here, just select the one that we have created.
After that, it’s a good thing to define the launch name template. This template will be used for launch naming in Allure TestOps. Let it be “jenkins”, then the job base name, which is this one, “allure-testops-demo” and then the build number provided by Jenkins.
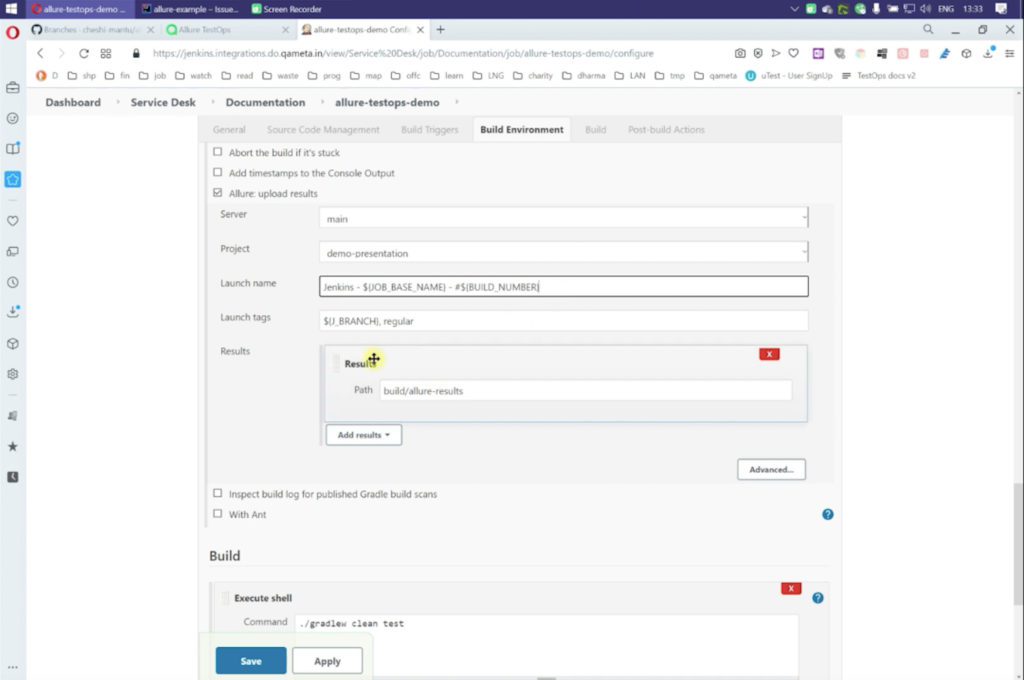
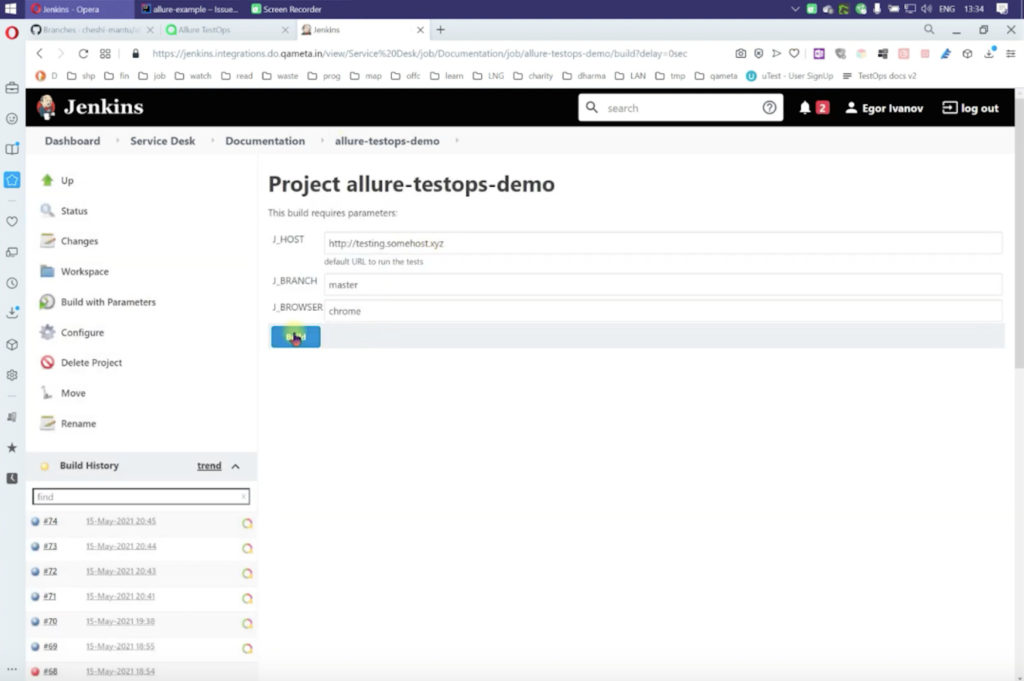
In the launch tags, as you see, we have already provided some variables, which is a branch. And the branch is the branch here. The default value is master and it is used right here to provide the branch on the GitHub side.
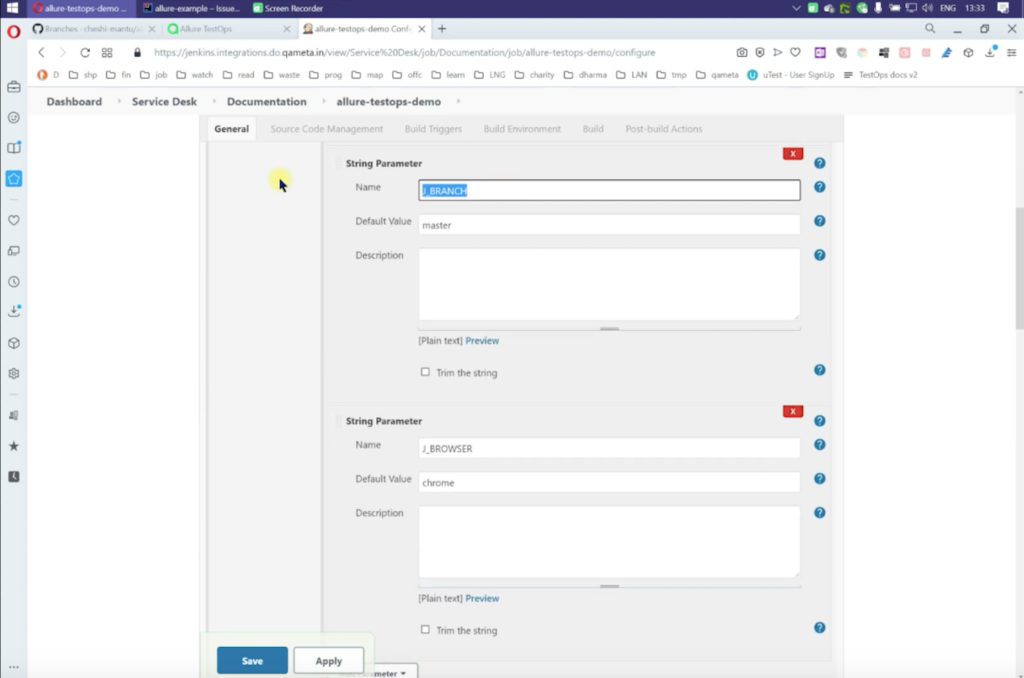
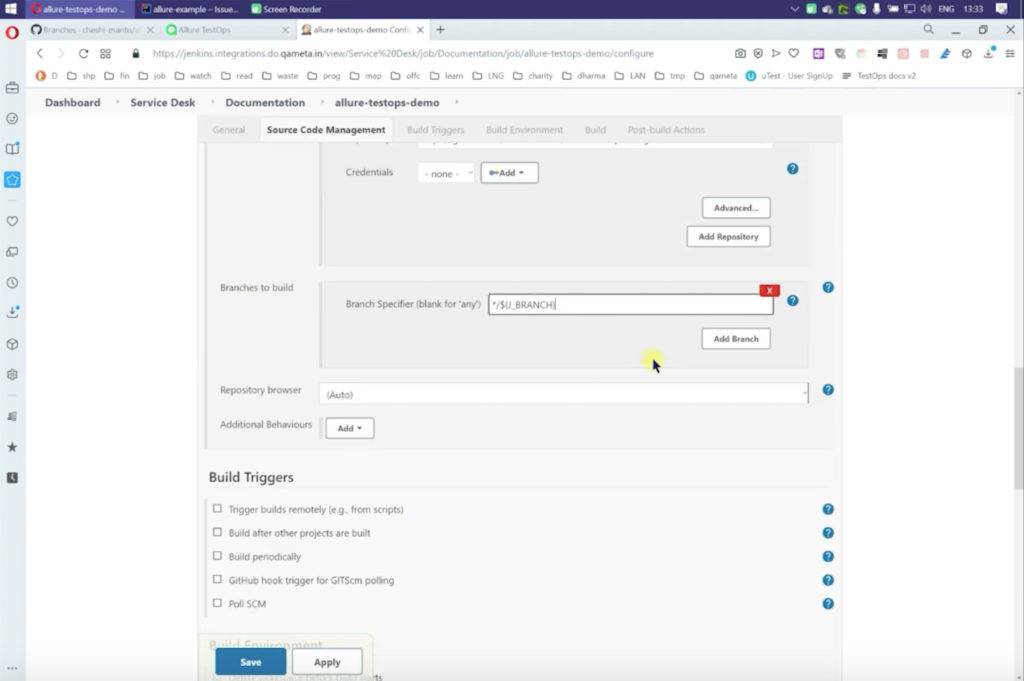
So it’s the name of the branch on the VCS, the version control system. Since we have provided all the information, we can save our job.
Running job on CI
Now, we need to start the build job. We will provide default parameters for that and just build.
As we jump to the Allure TestOps side, the job will start. In the Allure TestOps interface, you see that it’s already started.
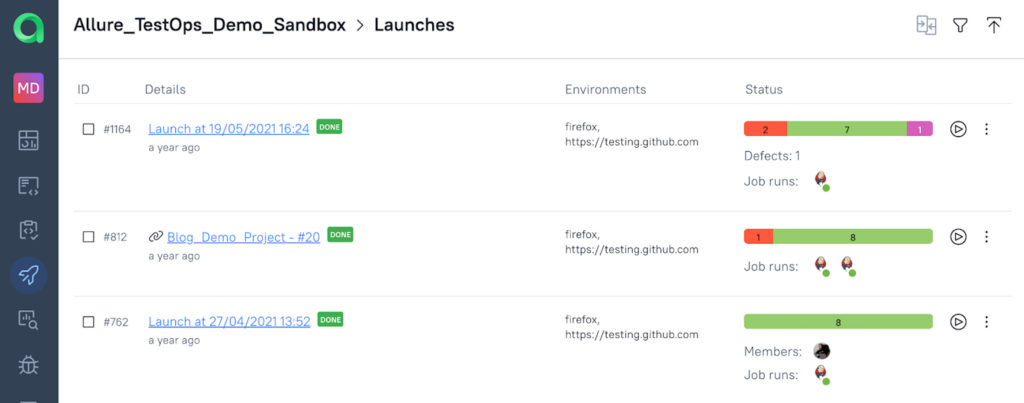
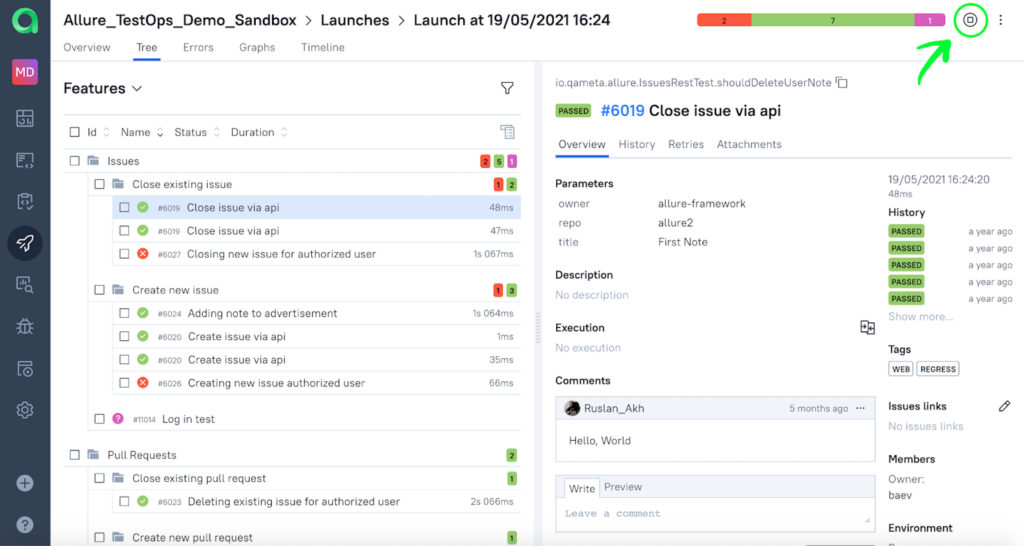
And you see that icon is blinking, when the icon stops blinking this is the sign that our test run is finished.
Test results representation
The next step of our work with Allure TestOps which is test results processing. So we need to analyze what happened, we need to understand it and we need to resolve it somehow.
After we complete these steps we will generate the test cases (or some say test documentation). Let’s dive into the launch statistics:
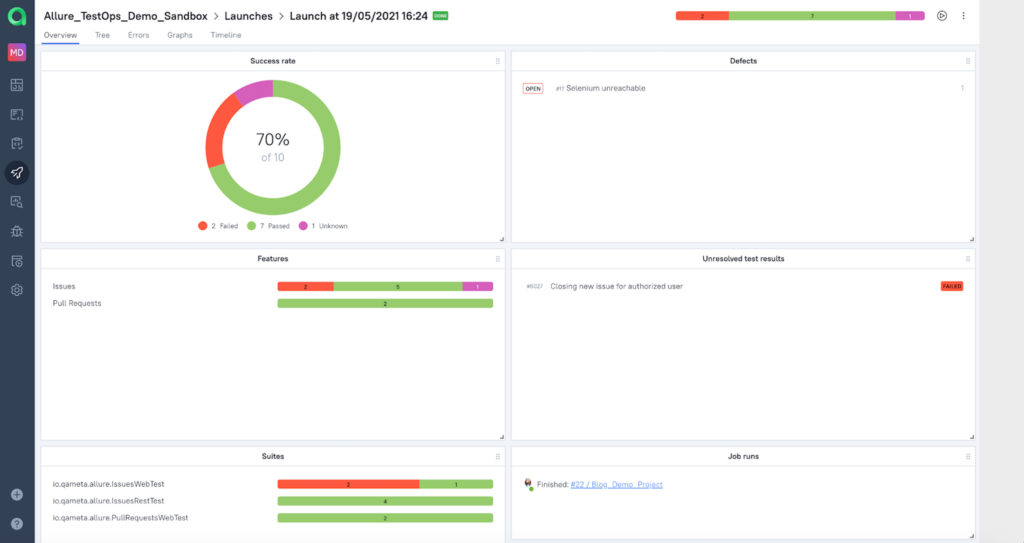
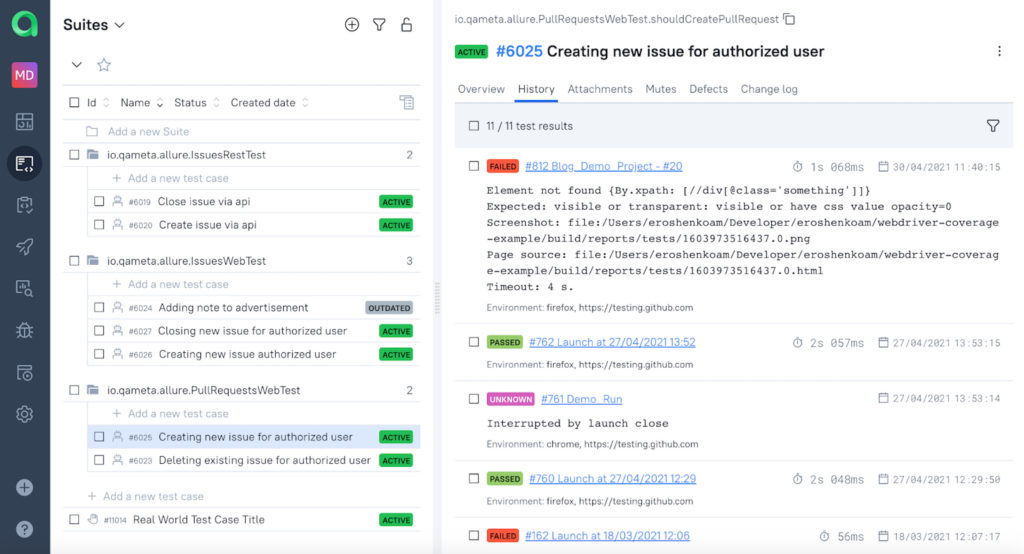
There are two features that are in the tests: issues and pull requests, and several suites. So the suite grouping is based on the package name and class name of the test. There are some failed tests in issues in a WebTest suite.
And in the initial analysis, you can see that there is an unresolved failed test result. The section displays all the test results that need to be analyzed. The Overview page also provides information about the job run. So it’s number 22 for our Blog_Demo_Project.
Parameterized Test Results
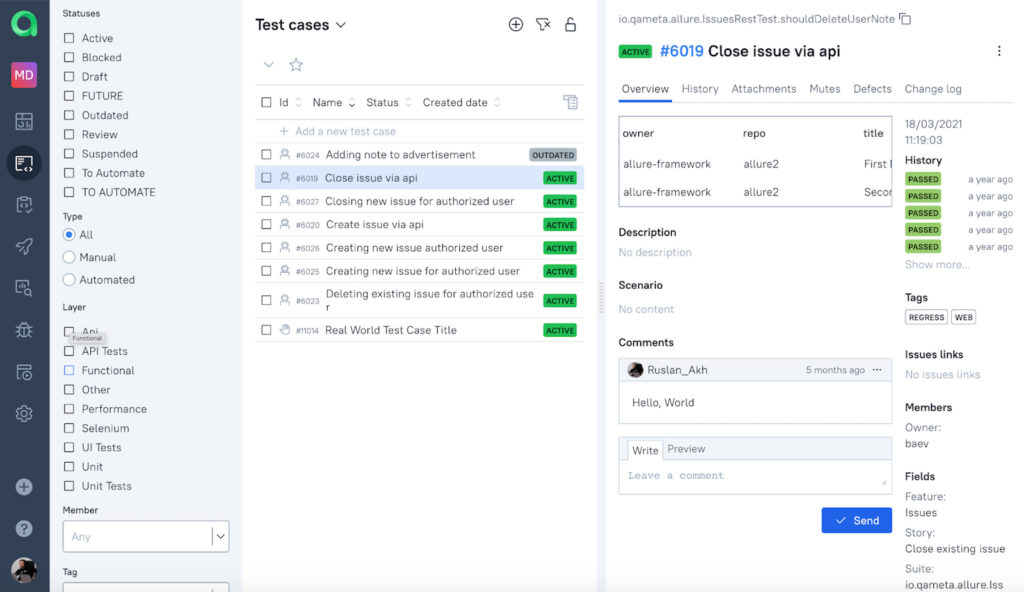
Let us explore the tree view for test results. And the tree is built based on the test results that we received. You can see that “Close issue via API” tests have the same ID.
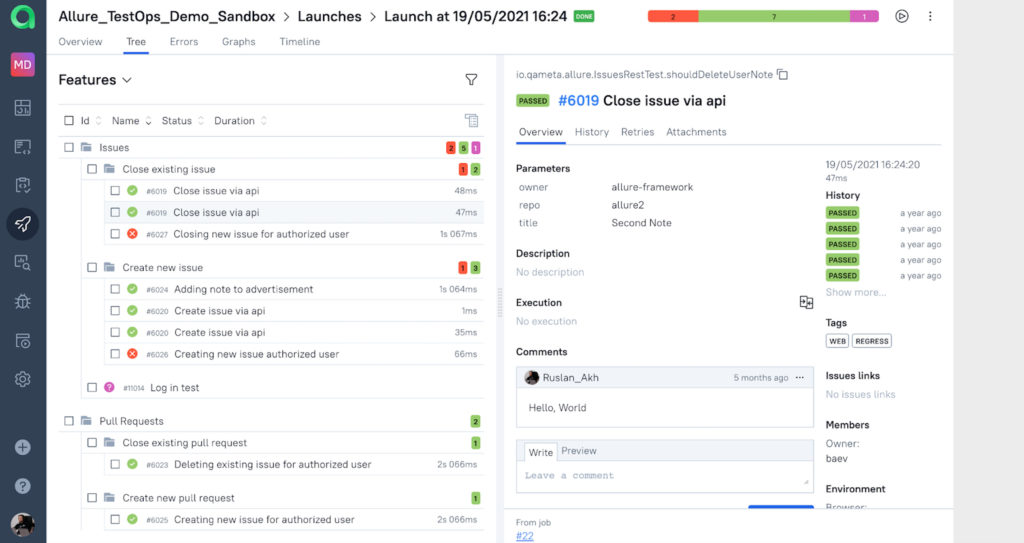
Why is that? It is because this test is parameterized. So we can see in the description of the test, that we received from the CI side, that there are several parameters: owner, repo and title.
In fact, the CI-system runs the test several times with different parameters, so there are several test results. That is the case when Allure TestOps provides several results for a single test case.
Analysis
The next step is analyzing what happened in a failed test. Let’s take a closer look. I will take another test as an example, but it contains the same issue as ours.
As we open the red test, we can see that startDriver worked fine, but something went wrong on the “Open issues page’ step with specific parameters.
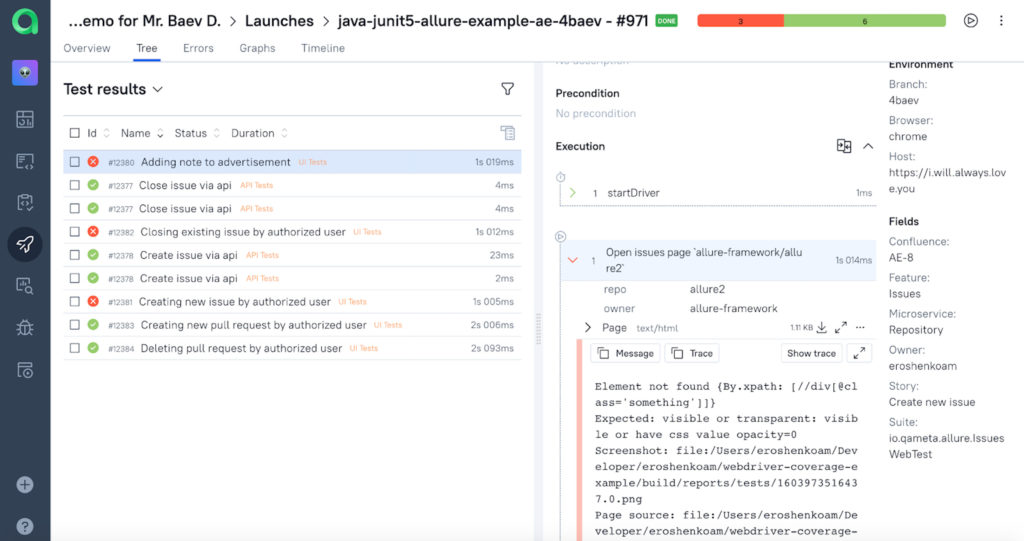
Apparently, the error message says there is an object missing. By now, we will just create a Defect to save the issue and automate this exact bug detection. Defect guide will be available in further posts, stay tuned!
Generating test cases / test documents
The last part of this Quick Start Guide today is test case generation from a launch. In a new project, the test cases tab will be completely empty at first. But there was a launch executed before!
To generate test cases (or test documentation) from test results, or to gain some analytical data about the results, we need to close the launch.
When the launch is closed, all the data about the test results get processed by Allure TestOps. After that, test cases are generated. There are two options to close the launch: it’s manual and scheduled. Manual closure is easy, a simple button on the launch page:
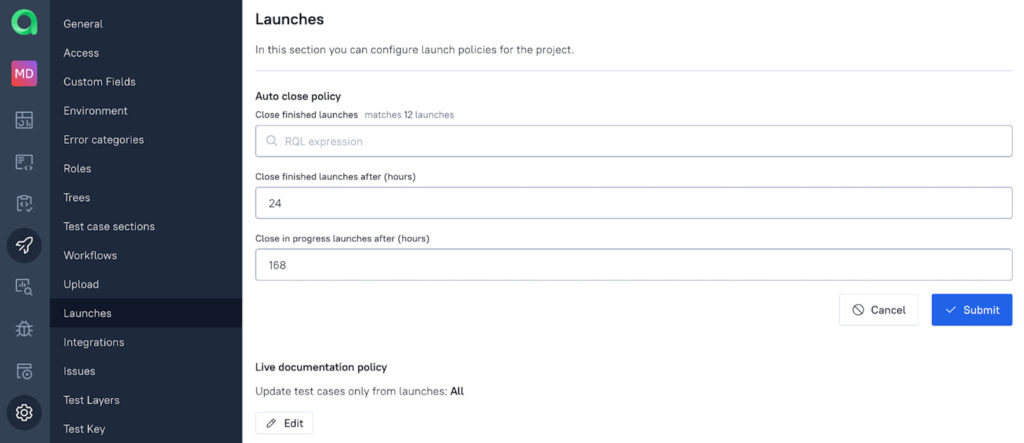
To set up automated launch closing by schedule, go to the settings, and click the “Launches” button. This is the automated close policy setup page.
In this case, Allure TestOps will close the launches 24 hours after they are executed, and 168 hours if there is any activity: crashed tests or unexecuted manual tests waiting.
And after 24 hours each launch, that is completed, will be closed. So information from the test results will be added to the test cases. We can close the launch manually, so the generated test cases from the test results will be created asap.
Allure TestOps doesn’t have a “folders” view to represent and group test cases. It uses information provided from the tests. For example, there is information about the Feature, which as “Issues”, or Story “Close existing issue”.
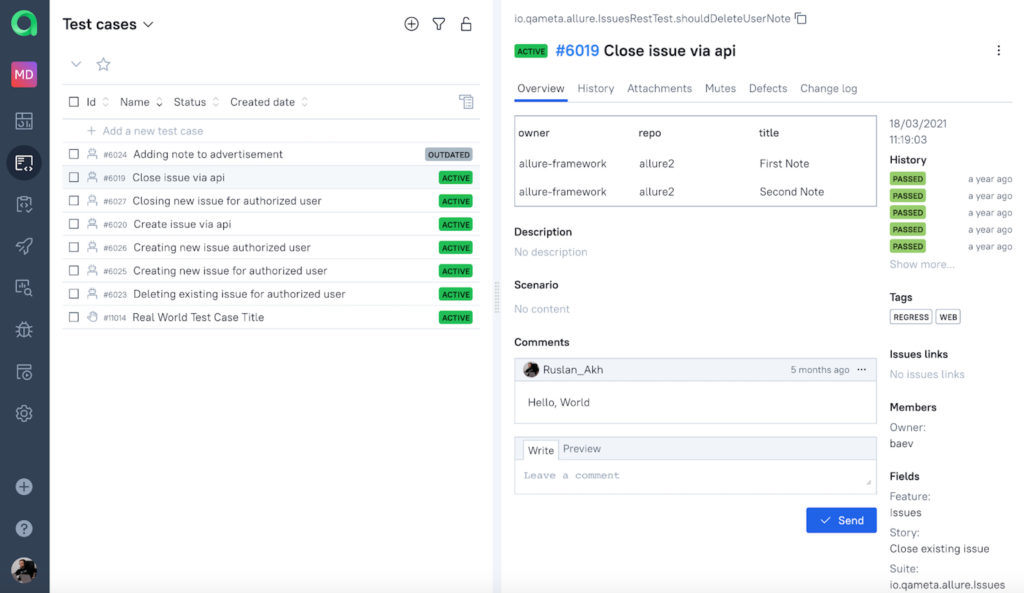
As you can see, the test case list is plain and simple. This might look good with a dozen test cases, but how do we navigate through several hundreds of tests? That’s the neat part. Allure TestOps supports a flexible and powerful system of test case grouping and filtering by any custom or default state of the field. We have provided the reasoning for building such a system in a dedicated blog post.
And even without any further setup, we can get several views: Features, Suites, or plain list:

Each test case contains a lot of data and metadata. In time, you’ll start using the history, defects and changelog tab for a test case.
- The history tab contains all the data about runs of a particular test.
- The Defects tab shows the states of defects linked to a TC.
- Changelog provides a GitHub-like UX for managing and backtracking all the test case updates: tags, statuses, issue-trackers linking, layers, and configuration. No more investigation on who and when a test was changed or why a layer label has been deleted.
Learn more about Allure tools
Qameta Software focuses on developing amazing tools that help software testers. Learn more about Allure Framework, a lightweight automation reporting tool, and Allure TestOps, the all-in-one DevOps-ready testing platform.
Subscribe to our Monthly Newsletter (below) or follow us on LinkedIn or Twitter, or ask for assistance on GitHub Discussions.
This is the end of the first part of ‘Allure TestOps at UltimateQA’ series. Next time, we’ll learn how to generate automated tests code from human-written manual test cases and fill in all the metadata to test cases to gain deep and precise analytics after runs.
Good