Basic react concepts
Components
- Are similar to functions where you provide input and get output back. Input is props, state. Output is the UI.
- You do not invoke components, rather you use them
Components should be named with a Capital letter because otherwise React will think that you are referring to HTML elements.
Props are immutable, meaning they cannot be changed
Function component
//a function component is simpler than class component
function Square(props) {
  //no more render()
  return (
    //no more this.props and no more ()=> onClick(), instead onClick
    <button className="square" onClick={props.onClick}>
      {props.value}
    </button>
  );
}

//the same class component
// 1. has a render()
// 2. has a this.props instead of props
// 3. onClick={() => this.props.onClick()} vs onClick={props.onClick}
class Square extends React.Component {
  render() {
    return (
      <button className="square" onClick={() => this.props.onClick()}>
        {this.props.value}
      </button>
    );
  }
}
//also a function component
const ChildComponent = () => {
  return (
    <div>
      <p>I am the child</p>
    </div>
  );
};
Functional components are stateless.
There are two types React components. The other way to create a component is using a class component which is stateful.
ES6 Class component
class ParentComponent extends React.Component {
  constructor(props) {
    super(props);
  }
  render() {
    return (
      <div>
        <h1>I am the parent</h1>
        { /* Change code below this line */ }
        <ChildComponent />

        { /* Change code above this line */ }
      </div>
    );
  }
};
It is best practice to call a component’s constructor with super, and pass props to both.
Creating and rendering an ES6 class component
class MyComponent extends React.Component {
    constructor(props){
        super(props)
    }
    render(){
        return(
            <div>
            <h1>My First React Component!</h1>
             </div>
        );
    }
}
//This is the method to render our component
ReactDOM.render(<MyComponent />, document.getElementById('challenge-node'))
useState()
useState is a hook in the React world.
const [currentStateValue, functionToSetNewStateValue] = useState(initialSTateValue)
function Button() {
	const [counter, setCounter] = useState(5);
	return <button onClick={() => setCounter(counter*2)}>{counter}</button>;
}
What is happening with the code above?
First, we have an array that gets the current state of the Component through the useState() method, which is initialized to 5. The array has a getter called counter and a setter called setCounter.
return <button onClick={() => setCounter(counter*2)}>{counter}</button>;
This second part says that we have a button element that performs some operation on a click, the onClick(). The operation that it defines is set in the {}. So in our case, there is an Arrow Function that’s called that will increment the current counter by 2, and then that value will be passed to setCounter.
The {counter} means that the current value of inside of the counter function will be displayed. Notice how the function isn’t called like counter(), but instead gets a reference to it like counter. The counter value will be displayed in the button.
The cool thing to notice is that we don’t actually do any manipulations of the DOM, React does that for us. All we do is set the action that happens on the click and React automatically updates the state of the DOM.
Best practices
- It’s considered a best practice to set
propTypeswhen you know the type of a prop ahead of time - try to minimize statefulness and to create stateless functional components wherever possible.
- Typically, if you have React components with input fields the user can type into, it will be a controlled input form.
- The best practice with React is to place API calls or any calls to your server in the lifecycle method
componentDidMount()
function Button() {
	const [counter, setCounter] = useState(0);
	return <button onClick={() => setCounter(counter+1)}>{counter}</button>;
}
The long return statements are obviously hard to read, we can clean up our code to look like this. Also, notice how the return statement has () and not {} because we aren’t returning an object:
function Button() {
	const [counter, setCounter] = useState(0);
//this function below makes the code more readable and must be declared in the Button component so that it has access to all of the variables
const handleClick = () => setCounter(counter+1);
	return (
    <button onClick={handleClick}>
      {counter}
    </button>
  );
}
How to render multiple components
ReactDOM.render(
  <React.Fragment>
    <Button />
    <Display />
  </React.Fragment>,
  document.getElementById('mountNode'),
);
React.Fragment is a special react keyword that tells React that you will have multiple elements inside of a single element. Below is an ever easier way to do React.Fragment using <>
ReactDOM.render(
  <>
    <Button />
    <Display />
  </>,
  document.getElementById('mountNode'),
);
Props
You can pass Welcome a user property by writing:
<App>
  <Welcome user='Mark' />
</App>
You use custom HTML attributes created by you and supported by React to be passed to the component.
Since Welcome is a stateless functional component, it has access to this value like so:
const Welcome = (props) => <h1>Hello, {props.user}!</h1>
Let’s breakdown some code of how to pass information from a parent component to a child component as props or properties.
//a function component, stateless
const CurrentDate = (props) => {
  return (
    <div>
      { /* Displays a <p> that shows the props.date value. That value will come in from the Calendar component. The date attribute is something that we created.*/ }
      <p>The current date is: {props.date}</p>
    </div>
  );
};

class Calendar extends React.Component {
  constructor(props) {
    super(props);
  }
  render() {
    return (
      <div>
        <h3>What date is it?</h3>
        { /* Calendar component renders the CurrentDate and passes in the "date" attribute that exists on CurrentDate */ }
        <CurrentDate date={Date()}/>
      </div>
    );
  }
};
Passing array as props
To pass an array to a JSX element, it must be treated as JavaScript and wrapped in curly braces.
<ParentComponent>
  <ChildComponent colors={["green", "blue", "red"]} />
</ParentComponent>
This will join all colors array items into a comma separated string and produce: <p>green, blue, red</p>
const ChildComponent = (props) => <p>{props.colors.join(', ')}</p>
Here’s an example of doing this with two components
// https://www.freecodecamp.org/learn/front-end-libraries
const List = (props) => {
  { /* tasks is just a dynamic property that we created and passed in through the <ToDo/>. The array is joining the properties together in a comma separated string. */ }
  return <p>{props.tasks.join(', ')}</p>
};

class ToDo extends React.Component {
  constructor(props) {
    super(props);
  }
  render() {
    return (
      <div>
        <h1>To Do Lists</h1>
        <h2>Today</h2>
        { /* We are passing in an array of tasks to our <List/> */ }
{ /* It's in a property=value syntax and value is a parameter so we get property={value} */ }
        <List tasks={["walk dog", "poop", "sleep"]}/>
        <h2>Tomorrow</h2>
        <List tasks={["walk dog", "poop", "eat"]}/>
      </div>
    );
  }
};
Use default props
Default props are helpful for setting a default value for when no prop is passed in. Here’s a code example
//https://www.freecodecamp.org/learn/front-end-libraries/react/use-default-props
const ShoppingCart = (props) => {
{ /* To set a default property, use the ComponentName.defaultProps and then set the values. This will set 0 for items if they aren't passed in */ }
  ShoppingCart.defaultProps = {
    items: 0
  };
  return (
    <div>
      <h1>Shopping Cart Component</h1>
    </div>
  )
};
We can even set the defaultProps outside of the component
const Items = (props) => {
  return <h1>Current Quantity of Items in Cart: {props.quantity}</h1>
}

Items.defaultProps = {
  quantity: 0
}
PropTypes
Use prop types to enforce the type of prop that is passed in.
import PropTypes from 'prop-types';
// the handleClick prop is expecting a function type
MyComponent.propTypes = { handleClick: PropTypes.func.isRequired }
Among the seven JavaScript primitive types, function and boolean (written as bool) are the only two that use unusual spelling. In addition to the primitive types, there are other types available. For example, you can check that a prop is a React element. Please refer to the documentation for all of the options.
Props in ES6 class components
The ES6 class component uses a slightly different convention to access props.
To access props within a class component, you preface the code that you use to access it with this. For example, if an ES6 class component has a prop called data, you write {this.props.data} in JSX.
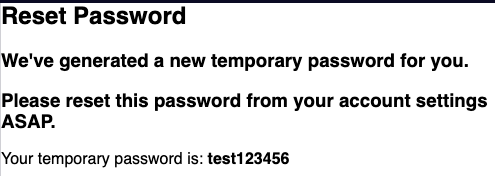
class ReturnTempPassword extends React.Component {
  constructor(props) {
    super(props);

  }
  render() {
    return (
        <div>
            { /* To access props in an ES6 class component, use the this keyword */ }
            <p>Your temporary password is: <strong>{this.props.tempPassword}</strong></p>
        </div>
    );
  }
};

class ResetPassword extends React.Component {
  constructor(props) {
    super(props);

  }
  render() {
    return (
        <div>
          <h2>Reset Password</h2>
          <h3>We've generated a new temporary password for you.</h3>
          <h3>Please reset this password from your account settings ASAP.</h3>
          { /* Render the component and pass in a tempPassword */ }
          <ReturnTempPassword tempPassword={'test123456'}/>
        </div>
    );
  }
};
Stateless vs Stateful components
A stateless functional component is any function you write which accepts props and returns JSX. A stateless component, on the other hand, is a class that extends
https://www.freecodecamp.org/learn/front-end-libraries/react/review-using-props-with-stateless-functional-componentsReact.Component, but does not use internal state (covered in the next challenge). Finally, a stateful component is a class component that does maintain its own internal state. You may see stateful components referred to simply as components or React components.
Stateful component
You create state in a React component by declaring a state property on the component class in its constructor. This initializes the component with state when it is created. The state property must be set to a JavaScript object. Declaring it looks like this:
this.state = {
  // describe your state here
}
Note that you must create a class component by extending React.Component in order to create state like this.
class StatefulComponent extends React.Component {
  constructor(props) {
    super(props);
    // Setting this.state.name in the constructor of the component
    this.state = {name: 'Nikolay'}
  }
  render() {
    return (
      <div>
        <h1>{this.state.name}</h1>
      </div>
    );
  }
};
Note that if you make a component stateful, no other components are aware of its state. Its state is completely encapsulated, or local to that component, unless you pass state data to a child component as props.
class MyComponent extends React.Component {
  constructor(props) {
    super(props);
    this.state = {
      name: 'freeCodeCamp'
    }
  }
  render() {
    // Here we are writing regular JavaScript so nothing special needed, notice even the comment
    const name = this.state.name;
    return (
      <div>
        { /* This part of the code is JSX, so we need some special syntax like comments and values of properties */ }
        <h1>{name}</h1>
      </div>
    );
  }
};
SetState()
// we can set the username key to the name 'Lewis' within our component
this.setState({
  username: 'Lewis'
});
React expects you to never modify state directly, instead always use this.setState()
//https://www.freecodecamp.org/learn/front-end-libraries/react/set-state-with-this-setstate
class MyComponent extends React.Component {
  constructor(props) {
    super(props);
    this.state = {
      name: 'Initial State'
    };
    this.handleClick = this.handleClick.bind(this);
  }
// The handleClick() is invoked when we press the button in the render(). It updates the state of the 'name' to 'React Rocks'
  handleClick() {
    this.setState({
      name: 'React Rocks!'
    })
  }
  render() {
    return (
      <div>
{/* When the onClick() event is triggered, that calls the handleClick() defined in MyComponent */}
        <button onClick={this.handleClick}>Click Me</button>
        <h1>{this.state.name}</h1>
      </div>
    );
  }
};
Bind ‘this’ to a Class Method
There are a few ways to allow your class methods to access this.
One common way is to explicitly bind this in the constructor so this becomes bound to the class methods when the component is initialized. You may have noticed the last challenge used this.handleClick = this.handleClick.bind(this) for its handleClick method in the constructor. Then, when you call a function like this.setState() within your class method, this refers to the class and will not be undefined.
class MyComponent extends React.Component {
  constructor(props) {
...
// forcing this to be bound to class methods when the component is initialized
    this.handleClick = this.handleClick.bind(this);
  }

  handleClick() {
    this.setState({
      name: 'React Rocks!'
    })
  }
However, state updates may be asynchronous – this means React may batch multiple setState() calls into a single update. This means you can’t rely on the previous value of this.state or this.props when calculating the next value. So, you should not use code like this:
// DON'T rely on code like this
this.setState({
  counter: this.state.counter + this.props.increment
});
The better approach is to do this:
this.setState((state, props) => ({
  counter: state.counter + props.increment
}));

//or like this if you only need state object
this.setState(state => ({
  counter: state.counter + 1
}));
Here’s an example using a full component:
//https://forum.freecodecamp.org/t/freecodecamp-challenge-guide-use-state-to-toggle-an-element/301421
class MyComponent extends React.Component {
  constructor(props) {
    super(props);
    this.state = {
      visibility: false
    };
    this.toggleVisibility = this.toggleVisibility.bind(this);
   }
  toggleVisibility() {
    this.setState(state => ({
      visibility: !state.visibility
    }));
  }
  render() {
    if (this.state.visibility) {
      return (
        <div>
          <button onClick = {this.toggleVisibility}>Click Me</button>
          <h1>Now you see me!</h1>
        </div>
      );
    } else {
      return (
        <div>
          <button onClick = {this.toggleVisibility}>Click Me</button>
        </div>
      );
    }
  }
};
A Controlled input
class ControlledInput extends React.Component {
  constructor(props) {
    super(props);
// input value is initialized with an empty string
    this.state = {
      input: ''
    };
  }
  // Change code below this line
  handleChange(event) {
    this.setState({
// using event.target.value we can access the value of the string
      input: event.target.value
    });
  }
  // Change code above this line
  render() {
    return (
      <div>
        { /* onChange of the input field, the handleChange() sets the new input value */}
<input value = {this.state.input} onChange = {this.handleChange.bind(this)}/>
        <h4>Controlled Input:</h4>
        <p>{this.state.input}</p>
      </div>
    );
  }
};
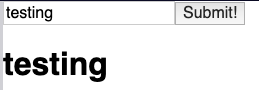
Create a controlled form
//https://www.freecodecamp.org/learn/front-end-libraries/react/create-a-controlled-form
class MyForm extends React.Component {
  constructor(props) {
    super(props);
    this.state = {
      input: '',
      submit: ''
    };
    this.handleChange = this.handleChange.bind(this);
    this.handleSubmit = this.handleSubmit.bind(this);
  }
  handleChange(event) {
    this.setState({
//On handleChange(), set the 'input' to the value
      input: event.target.value
    });
  }
  handleSubmit(event) {
    //prevent the page from refreshing
    event.preventDefault()
    this.setState({
      //setting value of 'submit' to the value in 'input'
      submit: this.state.input
    });
    // Change code above this line
  }
  render() {
    return (
      <div>
        <form onSubmit={this.handleSubmit}>
          {/* onChange attribute calls the function ‘handleChange’ */}
<input value = {this.state.input} onChange = {this.handleChange.bind(this)}/>
          {/* type set to submit indicating it is the button controlling the form */}
          <button type='submit'>Submit!</button>
        </form>
        {/* this.state.input would result in a duplicate string appearing in <h1> while being typed into <input> */}
        {/* so instead we use this.state.submit which gets its value from the handleSubmit(event), and that event is triggered on form submission */}
        <h1>{this.state.submit}</h1>
      </div>
    );
  }
}
The result is a form that looks like this
Pass State as Props to Child Components
In your
https://www.freecodecamp.org/learn/front-end-libraries/react/pass-state-as-props-to-child-componentsApp, you havestatethat contains a lot of user information, but theNavbaronly needs access to the user’s username so it can display it. You pass that piece ofstateto theNavbarcomponent as a prop.
Unidirectional data flow
An important concept in React is unidirectional data flow. State flows in one direction down the tree of your application’s components, from the stateful parent component to child components. The child components only receive the state data they need. Here’s an example
class Results extends React.Component {
  constructor(props) {
    super(props);
  }
  render() {
    {/* Results only has access to props because it is a child component and is stateless */}
    return <h1>{this.props.fiftyFifty ? "You Win!" : "You Lose!"}</h1>
  }
}

//The stateful component
class GameOfChance extends React.Component {
  constructor(props) {
    super(props);
    this.state = {
      counter: 1
    };
  }

  render() {
    return (
      <div>
        {/* Unidirectional flow: We're dynamically creating a prop called fiftyFifty and assigning it the value in the 'expression'. We're passing this value to the child and not the other way around <Results> */}
        <Results fiftyFifty={expression}></Results>
        <p>{'Turn: ' + this.state.counter}</p>
      </div>
    );
  }
}
The second is that complex stateful apps can be broken down into just a few, or maybe a single, stateful component. The rest of your components simply receive state from the parent as props, and render a UI from that state. It begins to create a separation where state management is handled in one part of code and UI rendering in another.
Below is an example of the two principles above
// https://www.freecodecamp.org/learn/front-end-libraries/react/pass-a-callback-as-props
//This is the stateful parent class
class MyApp extends React.Component {
  constructor(props) {
    super(props);
    this.state = {
      name: 'CamperBot'
    }
  }
  render() {
    return (
       <div>
         {/* Passing in a value from the state of the parent to the 'name' property of the child Navbar. Will receive 'CampterBot' in this case. The value gets stored in the child props object. */}
         <Navbar name={this.state.name}/>
       </div>
    );
  }
};

//This is the stateless child class
class Navbar extends React.Component {
  constructor(props) {
    super(props);
  }
  render() {
    return (
    <div>
      {/* To access the 'name' property that was passed in from the parent, we can read the props object. Because we passed in 'name' from the parent, we have that value stored in the props. */}
      <h1>Hello, my name is: {this.props.name}</h1>
    </div>
    );
  }
};
Pass a Callback as Props
you’re not limited to passing data. You can also pass handler functions or any method that’s defined on a React component to a child component. This is how you allow child components to interact with their parent components. You pass methods to a child just like a regular prop. It’s assigned a name and you have access to that method name under
https://www.freecodecamp.org/learn/front-end-libraries/react/pass-a-callback-as-propsthis.propsin the child component.
class MyApp extends React.Component {
  constructor(props) {
    super(props);
    this.state = {
      inputValue: ''
    }
    this.handleChange = this.handleChange.bind(this);
  }
  handleChange(event) {
    this.setState({
      inputValue: event.target.value
    });
  }
  render() {
    return (
       <div>
        { /* It's important to notice that it's the parent component that keeps passing state to the child components. This is seen by this.state.inputValue being set for the input props. */ }
        <GetInput input={this.state.inputValue} handleChange={this.handleChange}/>
        <RenderInput input={this.state.inputValue} />
       </div>
    );
  }
};

class GetInput extends React.Component {
  constructor(props) {
    super(props);
  }
  render() {
    return (
      <div>
        <h3>Get Input:</h3>
        <input
          value={this.props.input}
          onChange={this.props.handleChange}/>
      </div>
    );
  }
};

class RenderInput extends React.Component {
  constructor(props) {
    super(props);
  }
  render() {
    return (
      <div>
        <h3>Input Render:</h3>
        <p>{this.props.input}</p>
      </div>
    );
  }
};
Lifecycle management
lifecycle methods, or lifecycle hooks, allow you to catch components at certain points in time.
some of the main lifecycle methods:
componentWillMount()componentDidMount()shouldComponentUpdate()componentDidUpdate()componentWillUnmount()
componentWillMount()
The componentWillMount() method is called before the render()
componentDidMount()
This method is called after a component is mounted to the DOM.
The best practice with React is to place API calls or any calls to your server in the lifecycle method componentDidMount()
// https://www.freecodecamp.org/learn/front-end-libraries/react/use-the-lifecycle-method-componentdidmount
class MyComponent extends React.Component {
  constructor(props) {
    super(props);
    this.state = {
      activeUsers: null
    };
  }
  componentDidMount() {
    setTimeout(() => {
      this.setState({
        activeUsers: 1273
      });
    }, 5000);
  }
  render() {
    return (
      <div>
        {/* The value of activeUsers will be displayed after a certain duration that was set in the setTimeout(). In this case 5000ms. It can also be an API call that's called in componentDidMount() and then returns a value of activeUsers. */}
        <h1>Active Users: {this.state.activeUsers}</h1>
      </div>
    );
  }
}
The componentDidMount() method is also the best place to attach any event listeners you need to add for specific functionality.
React provides a synthetic event system which wraps the native event system present in browsers. This means that the synthetic event system behaves exactly the same regardless of the user’s browser – even if the native events may behave differently between different browsers.
https://www.freecodecamp.org/learn/front-end-libraries/react/add-event-listeners
Event Listeners
componentDidMount() method is the best place to attach any event listeners
In componentWillUnmount() use document.removeEventListener() to do any clean up on React components before they are unmounted
//https://www.freecodecamp.org/learn/front-end-libraries/react/add-event-listeners
class MyComponent extends React.Component {
  constructor(props) {
    super(props);
    this.state = {
      message: ''
    };
    this.handleEnter = this.handleEnter.bind(this);
    this.handleKeyPress = this.handleKeyPress.bind(this);
  }
  // This method is great for adding event listeners
  componentDidMount() {
    //addEventListener(event, this.function)
    document.addEventListener("keydown", this.handleKeyPress)
  }
  //It's good practice to use this lifecycle method to do any clean up on React components before they are unmounted and destroyed. Removing event listeners is an example of one such clean up action.
  componentWillUnmount() {
    document.removeEventListener("keydown", this.handleKeyPress)
  }

  handleEnter() {
    this.setState((state) => ({
      message: state.message + 'You pressed the enter key! '
    }));
  }
  handleKeyPress(event) {
    if (event.keyCode === 13) {
      this.handleEnter();
    }
  }
  render() {
    return (
      <div>
        <h1>{this.state.message}</h1>
      </div>
    );
  }
};
shouldComponentUpdate()
Typically if any component receives new state or props, it re-renders itself and all its children.
shouldComponentUpdate(nextProps, nextState) allows us to decide if the child component should update or not. This method is a useful way to optimize performance.
Check out this example below
//https://www.freecodecamp.org/learn/front-end-libraries/react/optimize-re-renders-with-shouldcomponentupdate
class OnlyEvens extends React.Component {
  constructor(props) {
    super(props);
  }
  shouldComponentUpdate(nextProps, nextState) {
    console.log('Should I update?');
    // This checks to see if the number is even, and if it is, returns true.
// The 'value' is passed in the render() here <OnlyEvens value={this.state.value} />
    if(nextProps.value % 2 === 0){
      console.log('Its even');
      return true;
    }
    return false;
  }
  componentDidUpdate() {
// If the component re-rendered then this message is displayed
    console.log('Component re-rendered.');
  }
  render() {
    return <h1>{this.props.value}</h1>;
  }
}

// The Controller is the one that renders the button and the <OnlyEvens />
class Controller extends React.Component {
  constructor(props) {
    super(props);
    this.state = {
      value: 0
    };
    this.addValue = this.addValue.bind(this);
  }
  addValue() {
    this.setState(state => ({
      value: state.value + 1
    }));
  }
  render() {
    return (
      <div>
        <button onClick={this.addValue}>Add</button>
        <OnlyEvens value={this.state.value} />
      </div>
    );
  }
}
Inline styles
If you import styles from a stylesheet, it isn’t much different at all. You apply a class to your JSX element using the
https://www.freecodecamp.org/learn/front-end-libraries/react/introducing-inline-stylesclassNameattribute, and apply styles to the class in your stylesheet. Another option is to apply inline styles, which are very common in ReactJS development.
set the style equal to a JavaScript object
// React will not accept kebab-case keys in the style object. So we have to camelCase, fontSize for example
// Hyphenated words like font-size are invalid syntax for JavaScript object properties
<div style={{color: "yellow", fontSize: 16}}>Mellow Yellow</div>
- All property value length units (like
height,width, andfontSize) are assumed to be inpxunless otherwise specified.
We can even reuse styles to keep our code more organized.
//We can reuse styles to keep our code more organized
const styles = {
  color: "purple",
  fontSize: 40,
  border: "2px solid purple"
}

class Colorful extends React.Component {
  render() {
    return (
      <div style={styles}>Style Me!</div>
    );
  }
};
JavaScript in React Render Method
You can also write JavaScript directly in your
https://www.freecodecamp.org/learn/front-end-libraries/react/use-advanced-javascript-in-react-render-methodrendermethods, before thereturnstatement, without inserting it inside of curly braces. This is because it is not yet within the JSX code. When you want to use a variable later in the JSX code inside thereturnstatement, you place the variable name inside curly braces.
Below is an example of a HTML that gets rendered differently depending on an if/else statement
class MyComponent extends React.Component {
  constructor(props) {
    super(props);
    this.state = {
      display: true
    }
    this.toggleDisplay = this.toggleDisplay.bind(this);
  }
  toggleDisplay() {
    this.setState((state) => ({
      display: !state.display
    }));
  }
  render() {
    if(this.state.display) {
        return (
          <div>
            <button onClick={this.toggleDisplay}>Toggle Display</button>
            <h1>Displayed!</h1>
          </div>
        );
      }
    else {
        return (
          <div>
            <button onClick={this.toggleDisplay}>Toggle Display</button>
          </div>
        );
    }
  }
}
&& for a More Concise Conditional
{condition && <p>markup</p>}
If the condition is true, the markup will be returned. If the condition is false, the operation will immediately return false after evaluating the condition and return nothing.
//https://www.freecodecamp.org/learn/front-end-libraries/react/use--for-a-more-concise-conditional
class MyComponent extends React.Component {
  constructor(props) {
    super(props);
    this.state = {
      display: true
    }
    this.toggleDisplay = this.toggleDisplay.bind(this);
  }
  toggleDisplay() {
    this.setState(state => ({
      display: !state.display
    }));
  }
  render() {
    // There is a much more efficient way to render markup based on conditionals, using the && as seen below
    // {condition && <p>markup</p>}
    // in this case, when the display is true, we will display the h1, otherwise, we won't
    return (
       <div>
         <button onClick={this.toggleDisplay}>Toggle Display</button>
         {this.state.display && <h1>Displayed!</h1>}
       </div>
    );
  }
};
when an if/else statement was required, it was always outside the return statement. Ternary expressions can be an excellent alternative if you want to implement conditional logic within your JSX.
condition ? expressionIfTrue : expressionIfFalse;
Below is an example of using a more complicated ternary operator
//https://www.freecodecamp.org/learn/front-end-libraries/react/use-a-ternary-expression-for-conditional-rendering
const inputStyle = {
  width: 235,
  margin: 5
};

class CheckUserAge extends React.Component {
  constructor(props) {
    super(props);
    // Setting a property called 'state'
    this.state = {
      input:'',
      userAge:''
    }
    this.submit = this.submit.bind(this);
    this.handleChange = this.handleChange.bind(this);
  }
  handleChange(e) {
    this.setState({
      input: e.target.value,
      userAge: ''
    });
  }
  submit() {
    this.setState(state => ({
      userAge: state.input
    }));
  }
  render() {
    const buttonOne = <button onClick={this.submit}>Submit</button>;
    const buttonTwo = <button>You May Enter</button>;
    const buttonThree = <button>You Shall Not Pass</button>;
    return (
      <div>
        <h3>Enter Your Age to Continue</h3>
        <input
          style={inputStyle}
          type='number'
          value={this.state.input}
          onChange={this.handleChange}
        />
        <br />
        {/* if the userAge is empty, render buttonOne
        Otherwise, if the user age is greater than 18 then render buttonTwo, otherwise render buttonThree.
        Notice how we are referencing the values in our HTML using this.state */}
          {
          this.state.userAge === ''
            ? buttonOne
            : this.state.userAge >= 18
              ? buttonTwo
              : buttonThree
          }
      </div>
    );
  }
}
Render Conditionally from Props
Using props to conditionally render code is very common with React developers — that is, they use the value of a given prop to automatically make decisions about what to render.
https://www.freecodecamp.org/learn/front-end-libraries/react/render-conditionally-from-props
class Results extends React.Component {
  constructor(props) {
    super(props);
  }
  render() {
    {/* Results only has access to props because it is a child component and is stateless */}
    return <h1>{this.props.fiftyFifty ? "You Win!" : "You Lose!"}</h1>
  }
}

//The stateful component
class GameOfChance extends React.Component {
  constructor(props) {
    super(props);
//This component does have a state
//We always reference the 'state' by 'this.state'?
    this.state = {
      counter: 1
    };
    this.handleClick = this.handleClick.bind(this);
  }
  handleClick() {
    this.setState({
      counter: this.state.counter + 1
    });
  }
  render() {
    //this will return true/false in 50/50 odds
    const expression = Math.random() >= .5;
    return (
      <div>
        <button onClick={this.handleClick}>Play Again</button>
        {/* We're dynamically creating a prop called fiftyFifty and assigning it the value in the 'expression' We then reference this prop in our child component <Results> */}
<Results fiftyFifty={expression}></Results>
        <p>{'Turn: ' + this.state.counter}</p>
      </div>
    );
  }
}
Conditional CSS rendering
It’s also possible to render CSS conditionally
// Class MyComponent
  render() {
    let inputStyle = {
      border: '1px solid black'
    };
    // Updating the style based on the input
    if(this.state.input.length > 15){
      inputStyle.border = '3px solid red'
    }
Dynamic rendering of array elements
It’s really useful to use Array.map() to loop over an array and render the elements.
  render() {
    // Loop over the toDoList array and for each item, return a <li> with a key and the name of the item
    const items = this.state.toDoList.map((item,i) => <li key={i}>{item}</li>)
The code above will render a list that looks like this

When you create an array of elements, each one needs a key attribute set to a unique value. React uses these keys to keep track of which items are added, changed, or removed.
Array.filter() to Dynamically Filter an Array
filter, which filters the contents of an array based on a condition, then returns a new array. For example, if you have an array of users that all have a property online which can be set to true or false, you can filter only those users that are online by writing:
let onlineUsers = users.filter(user => user.online);
Here’s an example
//MyComponent
    this.state = {
      users: [
        {
          username: 'Jeff',
          online: true
        },
        {
          username: 'Alan',
          online: false
        },
        {
          username: 'Mary',
          online: true
        },
        {
          username: 'Jim',
          online: false
        },
        {
          username: 'Sara',
          online: true
        },
        {
          username: 'Laura',
          online: true
        }
      ]
    };
  }
  render() {
    //filter out to an array of users that are online
    const usersOnline = this.state.users.filter(user => user.online);
    //Create an array of usernames from the usersOnline
    const renderOnline = usersOnline.map((user,i)=> <li key={i}>{user.username}</li>);
Render React on the Server with renderToString
Mostly we render React on the client side, but sometimes we may want to render it on the server side using renderToString()
2 reasons for rendering on server side
First, without doing this, your React apps would consist of a relatively empty HTML file and a large bundle of JavaScript when it’s initially loaded to the browser. This may not be ideal for search engines that are trying to index the content of your pages so people can find you.
Second, this creates a faster initial page load experience because the rendered HTML is smaller than the JavaScript code of the entire app.
class App extends React.Component {
  constructor(props) {
    super(props);
  }
  render() {
    return <div/>
  }
};

ReactDOMServer.renderToString(<App/>)
Most useful React keyboard shortcuts
Using extension ES7 React/Redux/GraphQL/React-Native snippets
nfn→
const functionName = (params) => { }
How to add icons to our app?
npm i react-iconsThen we can use these icons like this
// We are utilizing npm package react-icons to add icons to our markup
import {FaTimes} from 'react-icons/fa'
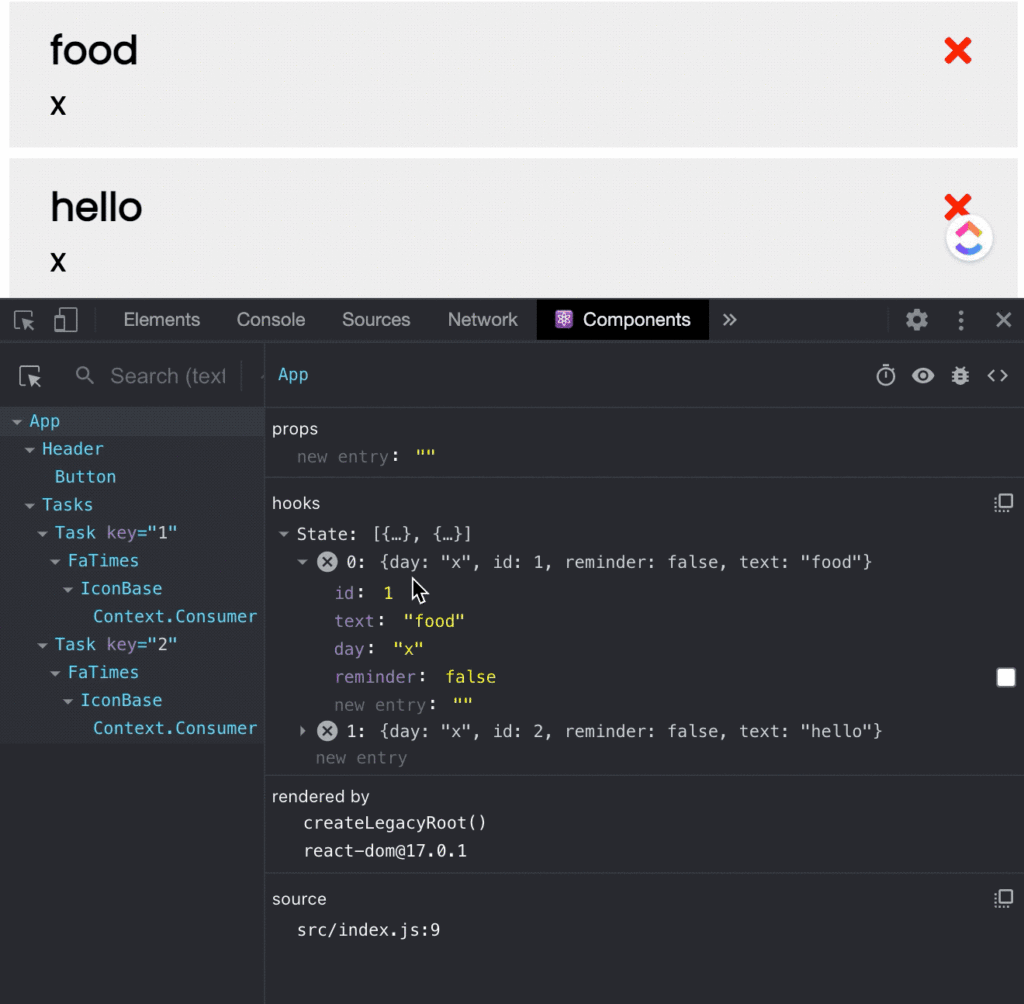
// rafce - React arrow function component export
const Task = ({task}) => {
return (
<div className='task'>
{/* FaTimes is a component from react-icons that creates an X */}
<h3>{task.text} <FaTimes style={{ color: 'red', cursor: 'pointer'}} />
...
Spread operator …
Spread syntax can be used when all elements from an object or array need to be included in a list of some kind. It is commonly used when you want to add a new item to a local data store, or display all stored items plus a new addition.
Here’s a simple example
let numberStore = [0, 1, 2];
let newNumber = 12;
numberStore = [...numberStore, newNumber];
Here is a more complicated example of in a potential React component
    //foreach task in our tasks, if the current task id is equal to the id that we're trying to set,
    // then take that task using the spread operator and add a reminder to it with the inverse of the reminder boolean
    // otherwise, just leave the task alone
  const toggleReminder = (id) => {
    setTasks(tasks.map((task)=> task.id === id ? {...task, reminder: !task.reminder} : task))
  }
The code above creates a functionality that looks like this
React errors
If we try to render a class component in our App.js and we don’t export, we will get the following error.
// Failed To Compile Error
./src/App.js
Attempted import error: './components/button' does not contain a default export (imported as 'Button').
Our App.js
//App.js
import Button from './components/class-component/Button'

function App() {
  return (
    <Button />
  );
}

export default App;

//Button.js
class ButtonComponent extends React.Component {
  constructor(props) {
...
And the Button is a class component
Useful tools
- React Dev Tools Extension
- Babel JS Repl – you can enter JSX code and see how React converts that code
Best React Resources in 2021
React Course by FreeCodeCamp.org
- Free
- Text based
- Tons of hands-on exercises
React JS Crash Course 2021
A free React course on Youtube that’s created by Traversy Media to teach how to build a To Do app using React.
React libraries in 2020
This post covers a bunch of excellent libraries that we can use to work with React. Some of my favorites include:
- How to test React components
- React authentication
- Animations in React
- How to set up Continuous Integration for JavaScript
- How to set up JavaScript Test Coverage
Stop mocking fetch
In this post, Kent C. Dodds outlines why we shouldn’t mock fetch in our React tests.
15 React Best Practices To Follow
This article covers some of React best practices. Some of our favorites include:
- Keeping components small
- Put CSS in JavaScript
- Separate stateful aspects from rendering
- Code should be testable
- Write tests for all code