
An automated atomic test (AAT) is one that tests only a single feature or component. An AAT should form a single irreducible unit. An automated test should not do something like end-to-end automation. As an aside, this concept is already well understood in unit and integration tests, but UI tests continue to lag behind.
We can usually tell that a test is atomic when:
- The test will only have one assertion or two assertions at most. Because sometimes we need one assertion to make sure our state is correct
- Atomic tests have very few UI interactions and they’re only on a maximum of two screens. In rare cases, an atomic test might navigate through 3 screens (although I’d like to see this example)
Advantages of atomic tests
- 1. Atomic tests fail fast
- 2. Atomic tests decrease flaky behavior
- 3. Atomic checks allow for focused testing
- 4. Atomic tests are short and fast (run in milliseconds)
Case Studies
Customer achieves 97% reduction in suite execution time
In this case study a customer achieved a 66% reduction in test case execution time. There were multiple strategies used to make this happen. What wasn’t mentioned was that after improving all the tests to be more atomic, the suite was combined this with massive parallelization to reduce the test suite execution time down to 7 minutes from 4 hours. With even broader test coverage 😁
To learn How to Create Automated Atomic Tests in Automation:
Examples of automated atomic tests
One common test that really abuses functional UI testing is a button click test. The typical goal of a button click test is to ensure that the action is performed. Rather than opening the app and running a functional test with Selenium, we can do something more efficient.
The Google Testing blog had this excellent example of how to create an atomic, automated UI test. Let’s break down the example…
//software under test
<button disabled=”true” click=”$handleBuyClick(data)”>Buy</button>
The test here is to make sure that clicking a button actually works as expected. This means that:
- click() actually invokes the right event
- the event invoked behaves appropriately
The first test can easily be done through the UI by rendering a single component. We can also render an entire page with just the button, but that’s a bit wasteful.
it('submits purchase request', () => {
// Renders the page with the “Buy” button and its associated code.
render(PurchasePage);
// Tries to click the button, fails the test, and catches the bug!
buttonWithText('Buy').dispatchEvent(new Event(‘click’));
expect(service).toHaveBeenCalledWith(expectedData);
});
That’s it! This is our atomic UI test that validates that clicking the ‘Buy’ button will perform the appropriate action.
We can validate that the logic happening inside of the handleBuyClick(data) is correct with an integration test:
it('submits purchase request', () => {
controller = new PurchasePage();
// Call the method that handles the "Buy" button click
controller.handleBuyClick(data);
expect(service).toHaveBeenCalledWith(expectedData);
});
The idea is the same as above as most buttons in the world behave in a similar manner. However, here’s another example with an Android app.
A click on any Button typically invokes some event. We would like to know that the correct event is fired and that the event does the right thing. Two atomic automated tests.
By looking at this HTML code for the button, we can see which event is invoked by the android:onClick().
<Button
    android:id="@+id/button_first"
    android:layout_width="wrap_content"
    android:layout_height="wrap_content"
    android:padding="16dp"
    android:text="@{viewModel.buttonText}"
    android:onClick="@{() -> viewModel.incrementCount() }"
    app:layout_constraintBottom_toBottomOf="parent"
    app:layout_constraintEnd_toEndOf="parent"
    app:layout_constraintStart_toStartOf="parent"
    app:layout_constraintTop_toTopOf="@id/main_TextView" />
This line of code is pretty obvious
android:onClick="@{() -> viewModel.incrementCount() }"
So all we need is a simple unit test to validate this part.
Test Two: Does the method do the correct thing?
Sure, now we know that the button will call the viewModel.incrementCount() . But how can we be sure that this method even works?
    fun incrementCount() {
        clickCount.value = clickCount.value?.plus(1)
    }
We can solve this problem with another unit test.
Full functional coverage
With these two tests we now know that the button click invokes the correct event and that the event performs the correct behavior.
In terms of functional behavior, the button is fully tested.
Let’s apply atomic testing to another scenario…
Testing for valid links with E2E tests
A common scenario in UI automated testing is to check that links of an application are clickable and that they navigate to the right URL. Unfortunately, we often perform this test with the use of too many resources. We can create optimal testing with automated atomic tests.
Here’s our sample application which I spent 2 years developing 😂:
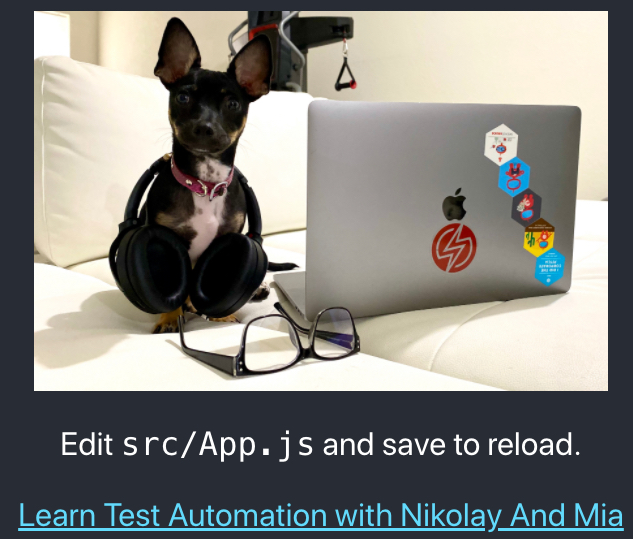
As with any web application, we would like to be able to:
- Click the link (Learn Test Automation with Nikolay and Mia)
- Assert that the link goes to the correct location
Creating automated atomic test for clicking links
A test clicking on links is unnecessary. Any <a> in HTML is clickable. Testing the click-ability of these tags means testing HTML and not custom code. If click-ability of <a> functionality is broken for our app, then it's also broken for… Share on X//Cypress test: clicking a link is actually a pointless activity
// Don't do this!
it('should click link',()=>{
cy.visit('http://localhost:3001/');
cy.get('.App-link').click().url().should('contain','ultimateqa.com');
})
As a result, such tests should be avoided.
Instead, the wiser test is whether the <href> attribute is what is expected. Hence, a more atomic test is to validate the value of the <href> .
//test that validates that the link is what we expect
it('should validate link is correct', () => {
   cy.get('.App-link').should('have.attr', 'href')
        .and('include','www.ultimateqa.com')
});
Testing for valid links with unit tests
An even better alternative for testing links is to write a unit test. Compared to E2E tests, unit tests are:
- 1000s of times faster
- Require less code and tools
- Drastically more robust
Software Under Test
Below you can see our SUT that’s written in React and hosted on Azure.

How do we ensure that each of the icons (Github, Youtube…) will take the user to the correct URL?
Analyzing the code further, we can see that the data is conveniently pulled from a JSON file that looks like this
    "website": "http://www.ultimateqa.com",
    "resumedownload":"http://www.ultimateqa.com",
    "social":[
      {
        "name":"github",
        "url":"https://github.com/nadvolod",
        "className":"fa fa-github"
      },
      {
        "name":"linkedin",
        "url":"https://www.linkedin.com/in/nikolayadvolodkin/",
        "className":"fa fa-linkedin"
      },
Hence, all we need to do is ensure that these links are valid.
As we discussed above, clicking links is actually a pointless test.
Unit test for valid links
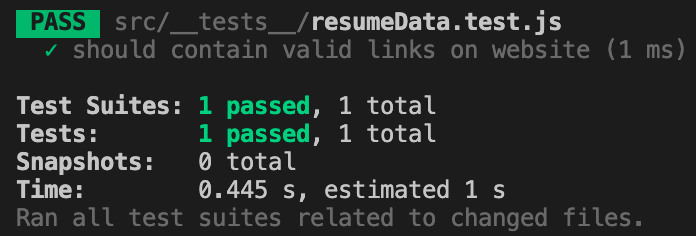
Using Jest we can write a test that looks like this (this test isn’t comprehensive):
//resumeData.test.js

const resumeData = require('../../public/resumeData.json');

//we don't actually need to test links through any other tool besides unit tests
test('should contain correct links', () => {
    expect(resumeData.main.website).toContain("www.ultimateqa.com");
    expect(resumeData.main.social[0]["name"]).toContain("github");
    expect(resumeData.main.social[0]["url"]).toContain("https://github.com/nadvolod");
})
We can see the failure behavior of the test below

Unit testing for link is a superior method compared to using a browser.
However, there is a major disadvantage to this approach, can you tell what it is? 🤔 Put your answer in the comments. 👇
We will cover a more efficient approach in the next section.
Testing for valid links (the optimal approach)
The method above of testing for links has a major disadvantage because:
- It’s burdensome to maintain all of the URLs in tests
- If you add more links, you need to write more tests or update existing tests
We can overcome this challenge with Snapshot Testing and it’s as simple as a single line of code!
Snapshot tests are a very useful tool whenever you want to make sure your UI does not change unexpectedly.
A typical snapshot test case renders a UI component, takes a snapshot, then compares it to a reference snapshot file stored alongside the test. The test will fail if the two snapshots do not match: either the change is unexpected, or the reference snapshot needs to be updated to the new version of the UI component.
https://jestjs.io/docs/en/snapshot-testing
All we need to do is write a test that looks like this
//resumeData.test.js
const resumeData = require('../../public/resumeData.json');

test('should contain correct links in social profiles', () => {
    expect(resumeData.main.social).toMatchSnapshot();
})
The Expected object is read from our resumeData.main.social portion of the JSON file and looks like this
//resumeData.json
  "social":[
      {
        "name":"github",
        "url":"https://github.com/nadvolod",
        "className":"fa fa-github"
      },
      {
        "name":"linkedin",
        "url":"https://www.linkedin.com/in/nikolayadvolodkin/",
        "className":"fa fa-linkedin"
      },
      {
        "name":"twitter",
        "url":"https://twitter.com/Nikolay_A00",
        "className":"fa fa-twitter"
      },
      {
        "name":"youtube",
        "url":"https://www.youtube.com/channel/UCVZXj9vKyZ6L2OakzRH2aOQ",
        "className":"fa fa-youtube"
      }
    ]
The toMatchSnapshot() of the test will create an automatic snapshot that matches exactly everything that we need to validate
// resumeData.test.js.snap

exports[`should contain correct links in social profiles 1`] = `
Array [
  Object {
    "className": "fa fa-github",
    "name": "github",
    "url": "https://github.com/nadvolod",
  },
  Object {
    "className": "fa fa-linkedin",
    "name": "linkedin",
    "url": "https://www.linkedin.com/in/nikolayadvolodkin/",
  },
  Object {
    "className": "fa fa-twitter",
    "name": "twitter",
    "url": "https://twitter.com/Nikolay_A00",
  },
  Object {
    "className": "fa fa-youtube",
    "name": "youtube",
    "url": "https://www.youtube.com/channel/UCVZXj9vKyZ6L2OakzRH2aOQ",
  },
]
`;
And when the test fails, it looks like this

🥇Snapshot tests are the most efficient way to test our app for valid links 🥇
Testing a list with multiple functionalities
Testing a list with multiple functionalities is a very common situation.

The list above has several functionalities that we can test:
- Does clicking the checkbox mark the item as “Done”?
- If a task is pinned by clicking the star, does it move to the top of the list?
How do we test this in an automated atomic manner?
First, notice how the list itself is already broken away from a page on which it might live. We can easily embed this list on any page, say behind a login. But why waste time navigating a login when we can just test the list independently for the functionality?
Test 1: Does clicking the checkbox mark the item as “Done”?
The most atomic way to do this is with a simple visual component test. There are multiple ways to do this, but we can create a Storybook story for our Task component.
Below is the actual source code from this component. This is the SUT.
//Task.js component
import React from 'react';
import PropTypes from 'prop-types';

export default function Task({ task: { id, title, state }, onArchiveTask, onPinTask }) {
  return (
    <div className={`list-item ${state}`}>
      <label className="checkbox">
        <input
          type="checkbox"
          defaultChecked={state === 'TASK_ARCHIVED'}
          disabled={true}
          name="checked"
        />
        <span className="checkbox-custom" onClick={() => onArchiveTask(id)} />
      </label>
      <div className="title">
        <input type="text" value={title} readOnly={true} placeholder="Input title" />
      </div>

      <div className="actions" onClick={event => event.stopPropagation()}>
        {state !== 'TASK_ARCHIVED' && (
          // eslint-disable-next-line jsx-a11y/anchor-is-valid
          <a onClick={() => onPinTask(id)}>
            <span className={`icon-star`} />
          </a>
        )}
      </div>
    </div>
  );
}
Let’s create a Storybook story to validate that the component behaves as expected. See the code below.
//Task.stories.js
import React from 'react';
import Task from './Task';
export default {
component: Task,
title: 'Task',
};
const Template = args => <Task {...args} />;
export const Archived = Template.bind({});
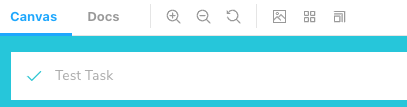
Archived.args = {
task: {
id: '1',
title: 'Test Task',
updatedAt: new Date(2018, 0, 1, 9, 0),
state: 'TASK_ARCHIVED',
},
};
As a result, we can render our component in an Archived state and see that in our UI like the image below
We can actually take this a step further and automate the visual testing of this component by using a solution like Screener.
What about the 2nd test?
Test 2: If a task is pinned by clicking the star, does it move to the top of the list?
The 2nd test is a bit trickier because it has to be related to other Tasks in the List. Regardless, we have our TaskList component that contains several Task components. We can write another Storybook test to ensure that the behavior is correct.
//TaskList.stories.js
export const WithPinnedTasks = Template.bind({});
WithPinnedTasks.args = {
  // Shaping the stories through args composition.
  // Inherited data coming from the Default story.
  tasks: [
    ...Default.args.tasks.slice(0, 5),
    { id: '6', title: 'Task 6 (pinned)', state: 'TASK_PINNED' },
  ],
};
When this component is rendered, the behavior is exactly as we expected. Again, we can take it to the next level by automating this and setting a baseline for future iterations.
Thanks to Storybook Docs for these excellent examples.
Login automation in an atomic manner
Most applications have a login component that we need to deal with whenever we test. Login automation through the UI is slow and unreliable. We need to be able to isolate this out of our test.
Login is typically the first and hardest thing that we need to do with most web applications. There are a few strategies for testing a login in an atomic manner.
Stub requests
Login Automation Examples
Cypress documentation has some excellent examples of how to handle different types of login such as SSO, Web Forms, JWT …
When is automated atomic testing inappropriate?
Automated atomic testing isn’t always appropriate. Let’s take a look at some cases.
Mobile blackbox testing (Appium)
Mobile applications are not as far along in technology or testing as web. As a result, it’s difficult to create automated atomic tests. One of the primary reasons for this is because mobile applications don’t always have endpoints that we can hit, elements that we can isolate, or JavaScript code that we can inject. As a result, for mobile automation with Appium, it’s acceptable to not have automated atomic tests.
However, it’s certainly possible with a concept called deep-linking.
Mobile whitebox testing (non-Appium)
Automated atomic testing IS possible with whitebox testing tools such as Xcode, Espresso, and React Native. Since these libraries have access to the source code, it is possible to test individual components. Hence, I recommend these libraries over Appium as testing is magnitudes of times easier.
Hello,
Very nice.. keep sharing such unique and useful piece of information.
Thanks for this blog. Very useful information. Its really great to know about automated atomic tests and how it actually works. I also got to know that when automated atomic tests are inappropriate.
I learned automated tests courses online through Gayatri Mishra. She is a great tutor for beginners. Courses provived by her includes Selenium testing, Software programming and many more.
The content is very rich. Writing atomic tests can quickly execute and get test results. The feedback of the test report is quick and targeted. The time to check the function status is generally completed within a few seconds. Moreover, the third benefit of writing atomic tests is that if atomic test cases fail, they will not block the testing of other functional use cases.
thanks for posting such material it help us a lot
Amazing write-up! I mean, that’s one good informative blog that focuses on the detailed aspects of the subject. Much appreciated.