In this post we are going to cover how to write a Selenium test using Visual Studio for Mac and .NET Core.
We are going to create a login test, as well as a Visual Studio Project.
Really awesome! Right?
Let’s get it started!
How to create a new test project in selenium with .Net Core?
Here we are in Visual Studio Community Edition for Mac.
Before we get started, I strongly recommend you to take a look at these testing best practices.
Let’s go ahead and see if you can remember how to create a new project.
You’re going to come here, add a new project.
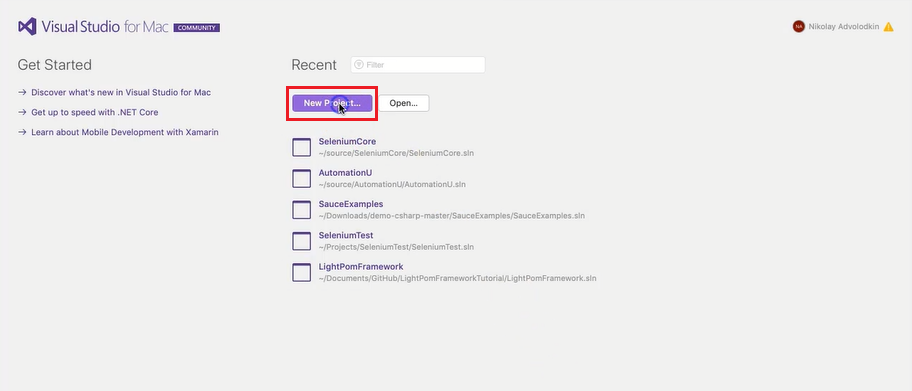
You can use the recently used MS test project. Or you can get it from “test”, then “MS test project”, and click “next”.
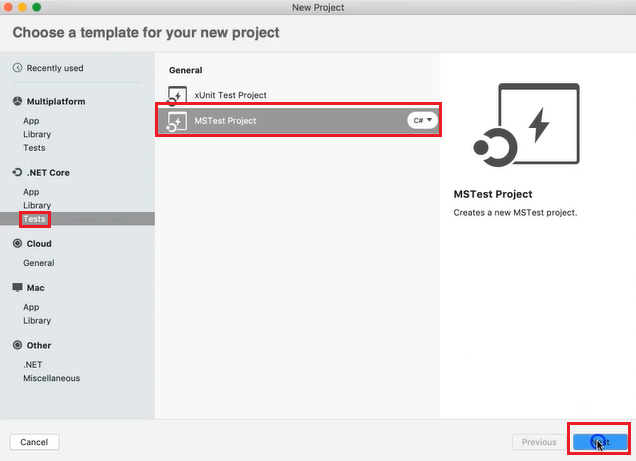
Use the latest .NET Core version, and then we’re going to give this project a name.
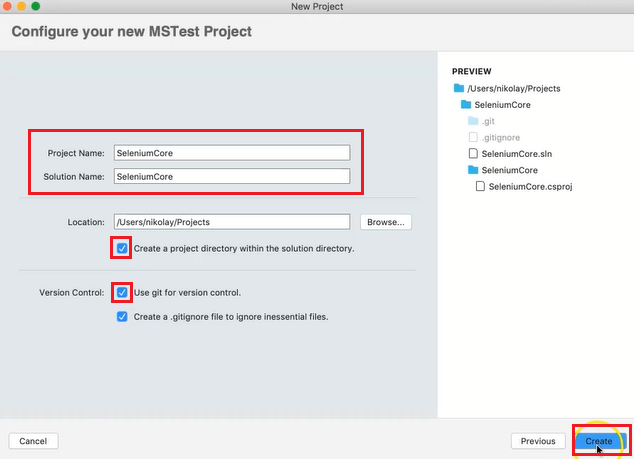
We will create a project directory and we’ll also use Git 4 version control.
We will select “.gitignore file” so we can ignore a bunch of Studio Visual files that are not necessary.
How to start code?
Alright, fantastic!
Here is our code.
Let’s just go ahead and simply rename the class. I don’t like this name.
Using “Command R” for rename, let’s call this HomepageFeature and let’s call this ShouldBeAbleToLogin().
Now, what is the exact application that we are testing and what is the test case that we’re going to automate? Let’s go ahead and take a look at that.
Describing the web application
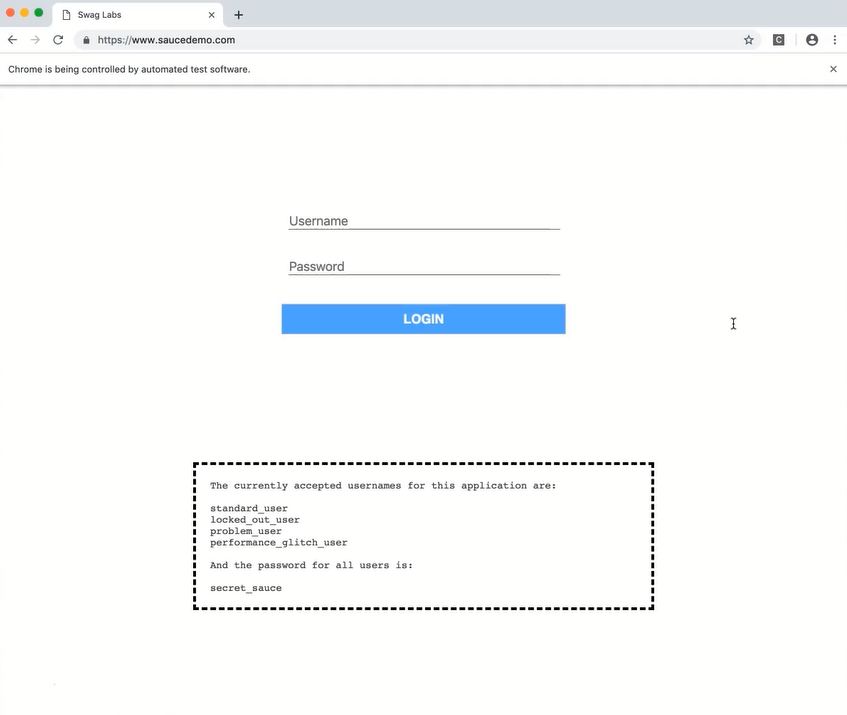
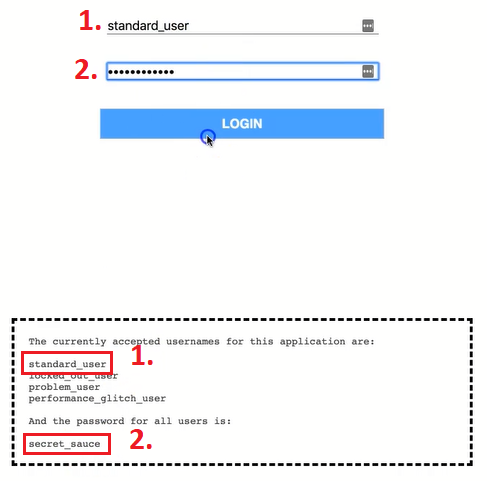
Here I have one of my new favorite demo applications for practicing test automation.
We can pull up this page and then use this “standard user”, paste them in the first box.
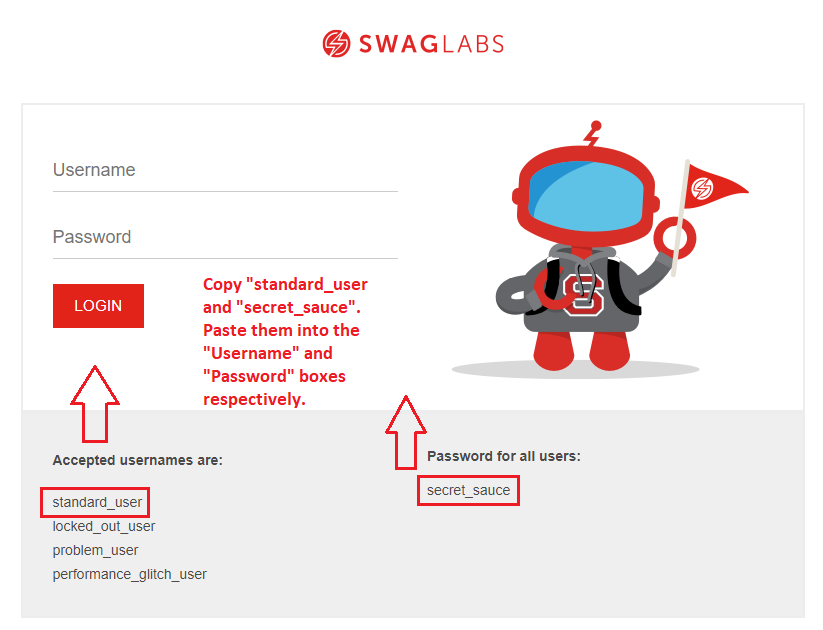
Then use this very secret password. Make sure you do not share it with anybody. It’s very, very secret!
How to start a login test?
We’re going to log in! After that, we will validate that we are logged in.
So that is going to be our scenario. Let’s go ahead and recreate it. And I’m actually going to grab this URL, as well.
What is the very first step we need to accomplish when doing test automation with Selenium with mac? Well, remember we need to create a driver instance.
A driver instance will allow us to communicate with any kind of browser that we want to support.
In this case, we have a Chrome browser, which you should have, as well, and we will create a driver instance that will work with that browser.
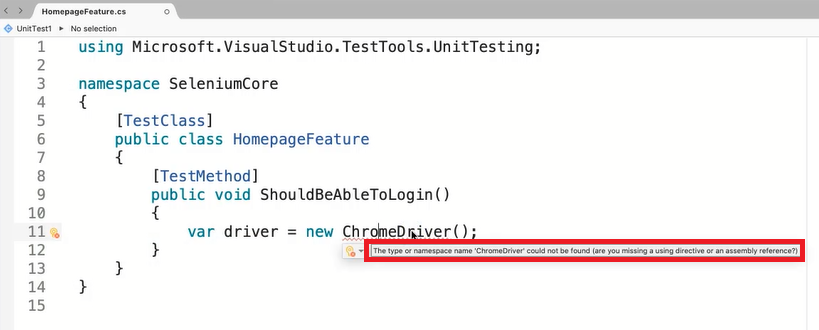
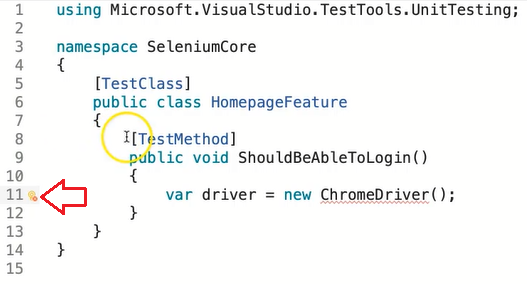
Alright, you can see here the compiler is complaining that ChromeDriver() does not exist.
The reason that it doesn’t exist is that we don’t have the appropriate NuGet package in order to be able to work with ChromeDriver().
How to add a NuGet package?
So, the NuGet package in C# is basically a package of code that someone has created that we can re-use in our test automation or in any C# code.
We just kind of pull it in.
In Java, it’s similar to a Maven package. In Ruby, they have the gems. Or, in JavaScript, we have the MPM packages.
The NuGet package is something very similar, just reusable code that we can use throughout our coding process.
Selenium with .NET Core has been created for us by the Selenium community and we can get that from the NuGet package store.
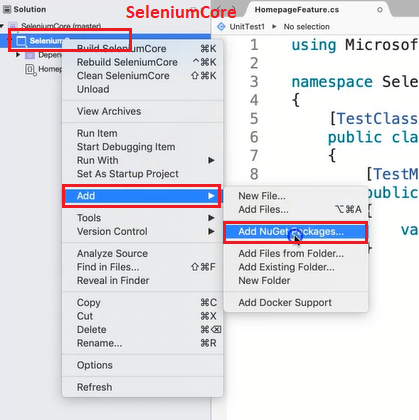
You can come here, “SeleniumCore”. You can right-click, you can do “add NuGet package” and we’re going to search for Selenium.
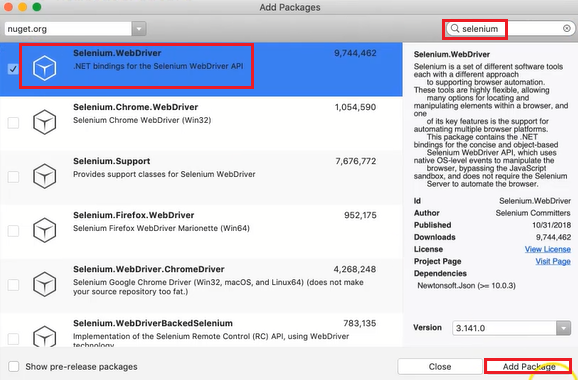
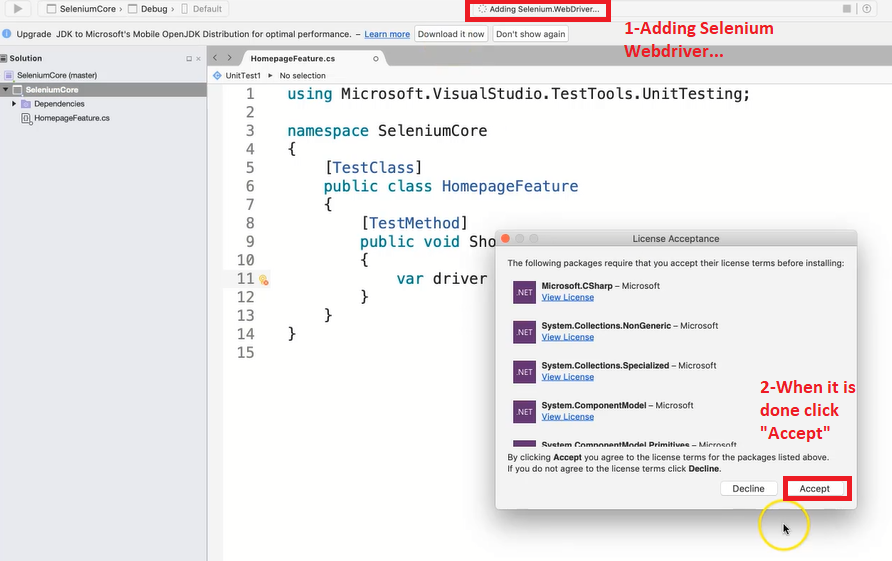
Selenium WebDriver’s the very top one so we’re going to select it and then we’re going to add it.
You can see up here that it’s adding Selenium WebDriver. As soon as it’s done, it’s going to tell us.
We’re going to accept the license and it says, “Selenium WebDriver successfully added.”
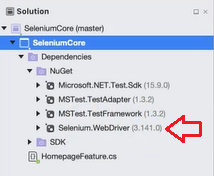
You’ll even find it here in the NuGet Selenium WebDriver folder, and you can see the version 3.141.0, is the latest one that we are using.
Now we can actually fix this problem.
Saying, “using OpenQA.Selenium.Chrome” and you’ll see an important statement appear at the top.
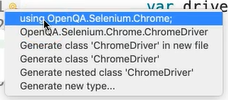
Boom! There we go, so now that is fixed.
Ok! We have a driver. What is the next step that we want to do?
Well, we want to open up the actual URL.
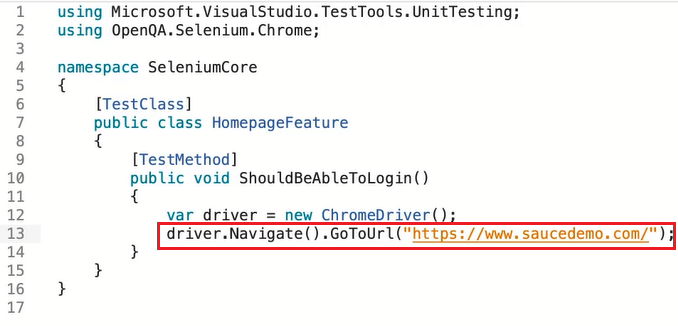
So we can do driver.Navigate().GoToUrl("https://www.saucedemo.com/")pasting our URL in here.
Fantastic! Wasn’t that so simple?
Now that we are able to navigate to our URL.
Executing our first test
Having a hard time with Selenium Webdriver? Why don’t you try to improve your skills here.
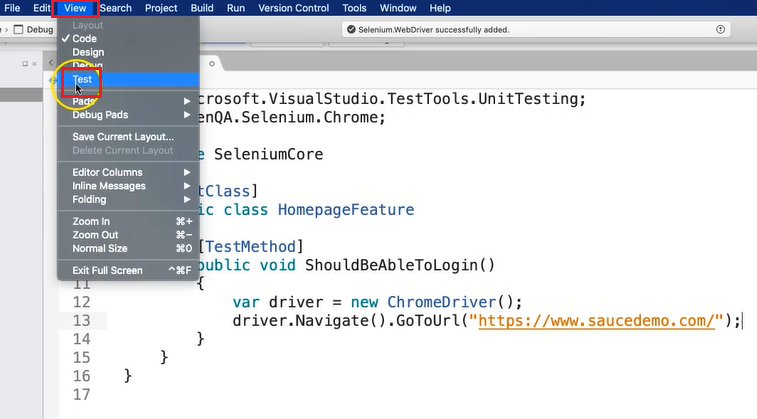
Let’s go ahead and actually run this test. We’re going to open up our test explorer. So here go to test, and then we’re just going to say “run all.”
Oh no! Something very weird happened here.
Errors always happen, don’t worry. There are some common Selenium Errors that may end up happening, you can check them right here.
Let’s go and take a look.

We got some kind of an exception, it says: “DriverServiceNotFoundException The chromedriver file does not exist in the current directory or in a directory on the PATH environment variable. The driver can be downloaded at that URL”.
Oh, okay, so remember that I told you that your code communicates with the WebDriver server that communicates with the browser?
Well, right now we’re missing the WebDriver server because we never downloaded the Chrome driver.
You need the actual executable, which is the server, to be able to talk to the different kinds of browsers.
There’s going to be a Chrome driver for a Chrome browser, a Safari driver for a Safari browser, and so on and so forth.
What we’re going to do is get our Chrome driver so that through it we can talk to our Chrome browser.
To get the Chrome driver, you can get it here.
Here you can see all the information, this is a very excellent page.
You always want to get the latest version of Chrome.
The latest version of Chrome driver will support the latest version of Chrome.
It’s actually a nightmare to try and make sure that your Chrome is not up to date.
Chrome always stays up to date, you need to make sure that your Chrome driver’s up to date, as well.
We’re going to go ahead and get the latest version of the Chrome driver available.
You can see, a bunch of details about it, for example, version 73.0.3683.20:
- Fixed error code returned from Execute Script command in some scenarios
- Made the HTTP server keep connection alive by default
- Fixed Close Window command to correctly handle user prompts
- Fixed error code returned while sending keys to disabled element
- Improved spec compliance of timeout value handling
- Improved spec compliance of Add Cookie command
- Increased HTTP server listening queue length
- Fixed Is Element Displayed command in v0 shadow DOM
- Added warning about Element Clear command behavior change in log file
- Fixed Execute Script command to correctly convert document.all into JSON format
- Improved handling of bad element reference
It even tells you which versions are supported and so on and so forth.
We’re going to get this version and you can see that here we have a bunch of downloads.
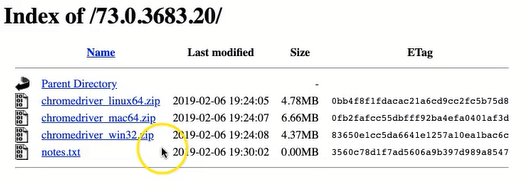
We’re going to go ahead and download the one for Mac since that’s where we’re using it.
If you’re using a different operating system, make sure you download the Chrome driver for the appropriate operating system.
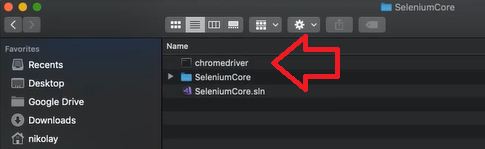
Here is my Chrome driver that I already extracted, and what I want to do is actually copy it over to the directory with my code, so that it’s part of the code base.
I’m going to come here and do copy Chrome driver, and I’m going paste it here.
Then, in our code, what we need to do is add it to a dependency on our code. So our code will know about it.
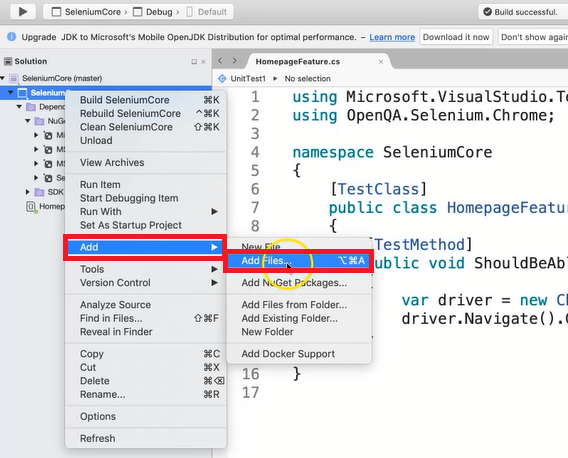
So I’m going to come here, do “Add Files…”
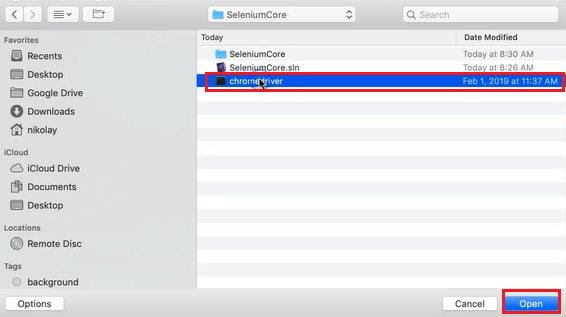
There’s our Chrome driver and we’re going to add it.
We’re going to move it to the file directory because apparently I didn’t put it in the right place.
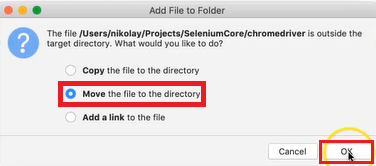
Alright and here we go.
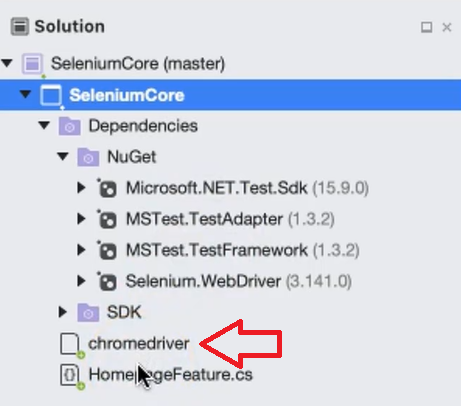
You can see that now chromedriver is now part of our solution.
This means that whenever we build everything, chromedriver will come along and we just have to perform one step to make that happen.
Go to properties…

Whenever we build we want this to be copied to the output directory and we want to copy, if newer.
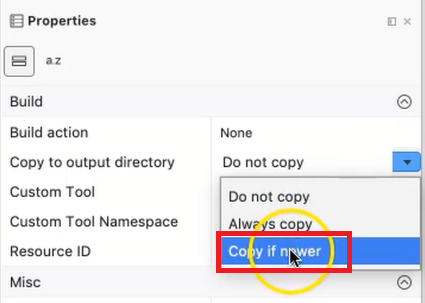
So if a newer version is found of Chromedriver that we put in here, this will automatically get copied, otherwise, it will just leave it in the bin directory.
Let me show you exactly what I mean by that.

Whenever we build our code, what happens is this bin folder gets created:
- bin
- Debug
- nercoreapp2.1
Right now you can see that we don’t have any chromedriver in here.
This where all of the executable, that we use for our testing and for our coding, go.
We need the chromedriver in here, so that whenever old executable are compiled, then it’s in there and we can reference it.
Now, if we build …
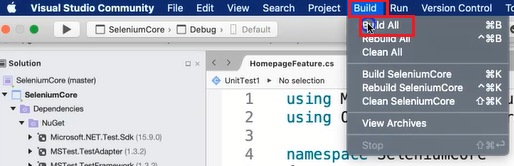
You can see that now chromedriver has appeared in here and so we have all of our executable in a single place so that we know exactly where to look for it.

Now there’s only one other thing left.
This Chrome driver constructor actually needs to know where the Chrome driver executable is.
You can either put in the path variable or you can put it inside of your code.
I like to put it inside of the code so that my code can figure out dynamically where the bin directory is.
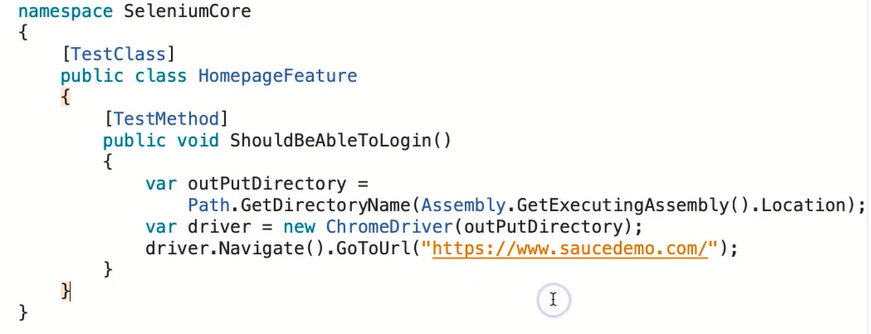
You can do it with this line of code here:
Path.GetDirectoryName(Assembly.GetExecutingAssembly().Location);
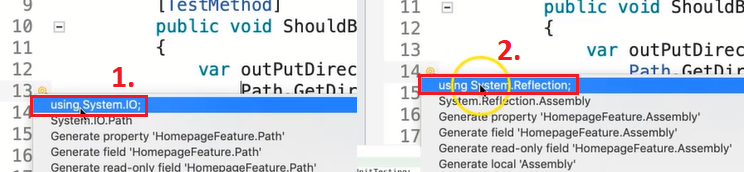
The compiler’s going to complain because we need to import System.IO (1) and then it complains about assembly because we need to import System.Reflection (2).
Then, this will compile, and this will automatically figure out where that bin debug application is, and it will go inside of this outPutDirectory variable and we can pass that to the ChromeDriver()
Now everything should work.
Let’s go ahead and give this a run and a browser should open.
Whoo-whoop! How awesome is that?!
We got our first Chrome browser open, going to saucedemo.com
Give yourself a pat on the back, you are officially an automation expert.
How to expand the test in selenium with .Net core?
Before we proceed further, I want to actually enhance this test.
Let me show you exactly what I’m going to do here.
So we’re going to create a method called CleanUp(). And we’re going to add a brand new attribute that you have not seen before called [TestCleanup].
What this going to do is, it’s automatically going to execute after every single test method. So this test method is going to run, and then afterward, the cleanup method is going to execute.
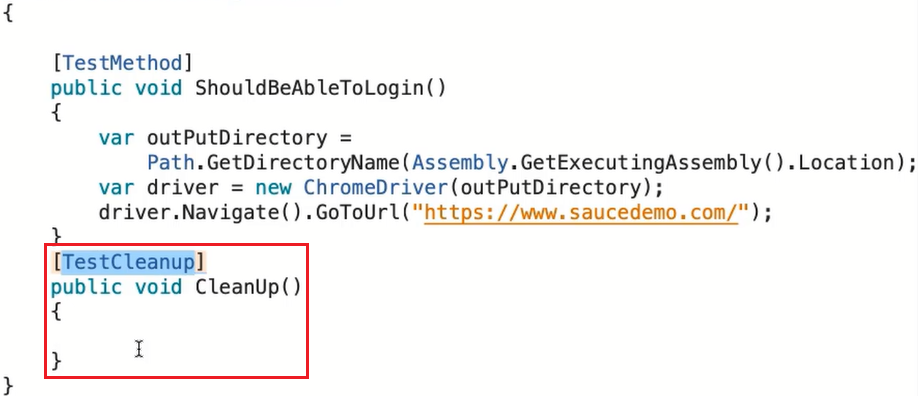
The reason I want to do that is I actually want to kill my ChromeDriver every time I run it. I am a lazy automation engineer at the end of the day, and I do like to automate things. Let’s do that!
So, I’m going to add here a class variable.

So right now you can see the compiler complaining about IWebDriver. We’re going to fix that by using OpenQA.selenium.

So now we have a variable called the _driver. We can use this variable.
Add that in here, and do a _driver.Quit. Now, every single time this test executes, it’s going to automatically exit for me.

We actually need to make sure that we store our driver in this variable.

There you go.
So now we’ve successfully stored the driver in this new class variable. And whenever our test runs, it will automatically clean up.
Let’s give this a run and see what happens. It’s probably going to be really quick.
Boom, did you see? It was really fast, but you will see it open up the browser, and it will clean it up for me.
So now I don’t have to press the X, and I can just continue to automate.
Interacting with the login form
The next steps that we want to do is interact with the login form, right?
So, the next step from that is, after we want to navigate to a URL, we want to start finding some elements.
Let’s go ahead and take a look at our browser and see how we can do that.
Here we have this page, and now we actually want to assert that this page has loaded successfully. We can probably locate this element and make sure that this element is in the appropriate state.

I’m going to come here. I’m going to look for this element, and I’m going to try to find the property that tells me that this element is unique on the page.
I like this class name here. It’s called the login-button. I’m going to copy it. I’m also going to do “Command F”, which will open up this Find window.

I can search for strings. So this tells me that the login button is unique because I only have a single match.

But, for example, if I searched for input, you can see that I have many inputs on the page, three inputs on the page, which is not unique.
I’m going to be using a class name loginButton.
So with that let’s locate our element.
We’re going to use our _driver and call a method called .FindElement. That unsurprisingly helps us to locate an element.
We’re going to use Selenium By.ClassName("login-button"), all this provided by Selenium with mac to locate that element.

Now that we have the element here, we can do many kind of different actions that I already showed you about.
But, we first want to make sure this element is actually in the right state before interacting with it.
We’re going to use a synchronization technique known as an explicit wait to locate that this element in the appropriate state.
In order to do that, we need another nugget package. Let’s go ahead and get that nugget package here.
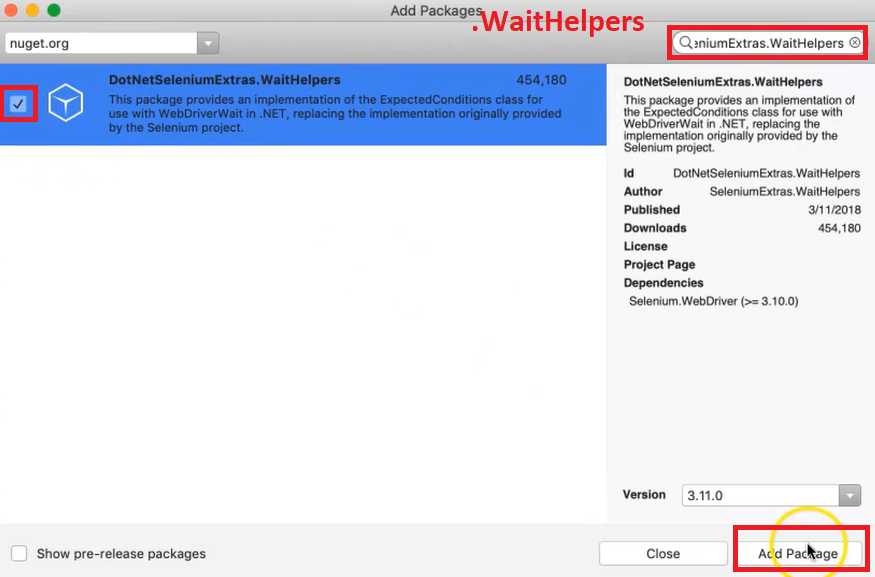
So what you can do is look for this nugget package right here “.WaitHelpers”.
We’re going to add it to our solution as well.
Now let’s use these WaitHelpers to wait for an element.
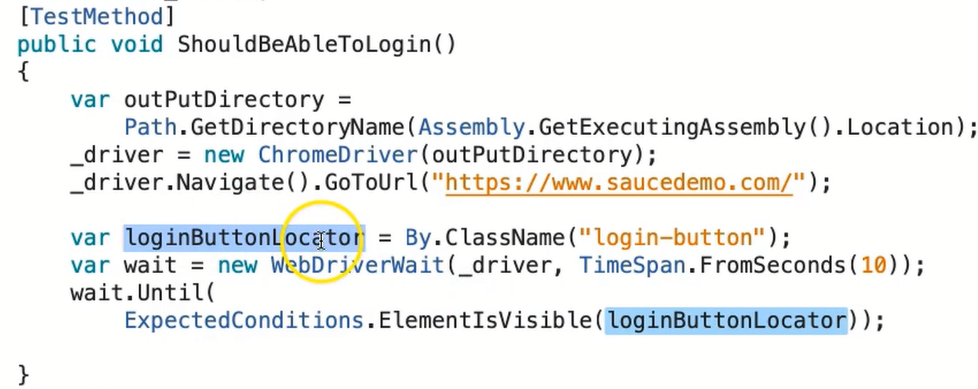
Okay! What I’ve done here is, I’ve created an object that’s known as the WebDriverWait type.
This will wait for up to a maximum of 10 seconds for an element to be in a specific condition before it throws an exception.
Now, here’s the specific condition that we’re using from Selenium, from the ExpectedConditions class. We’re going to check that the element is visible (ElementIsVisible).
What I’ve also done is, because ElementIsVisible method takes in a bi-locator. I’ve renamed this variable to call it loginButtonLocator and instead of finding the element, what we did was just store the locator and I passed that locator in here as well.

Now, our test will open up the page and wait for up to 10 seconds for that element to be visible. Let’s go ahead and run it and see what happens.
You see how it quickly opens up the page. Now let’s proceed with the rest of the actions.
How to indentify the elements with the form?
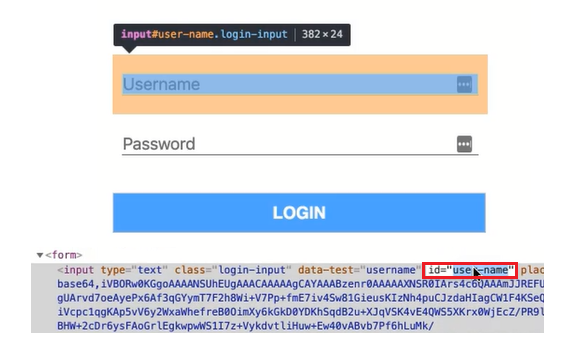
Let’s go ahead and identify all the elements with the form. So how are we going to locate the user name?
Here’s the user name, which has an ID, fantastic. ID is the best locators to use because they are unique.
Alright, so here’s I’ve located all our fields we need to interact with the page. And now we just simply have to interact with them. So let’s do that.

Here what we’ve done is, used the username field and we’re using the .SendKeys method from Selenium too.

Type in the username, here we’re using the password field to type in the very secret password that you should not share under any circumstance.

And then we’re using the login button that we’ve located previously and we’re clicking. That will allow us to login.

Let’s go ahead and run this test and see what happens.
Alright, cool. So you can see that happen really fast.
And there’s one more step left that we want to make sure and that we are successfully logged in. Let’s go ahead and implement that as well.
Validating we are logged into the correct page
The final step is we just need to validate that we’re logged into the correct page, right?
So let’s go ahead and do that. Let’s see how that works once we’re logged in.
What happens?

Well, we’re actually redirected to this URL so I’m just going to use that.
Here is where our beautiful insertion comes in. We can use the Assert class Assert.IsTrue(_driver.Url.Contains("inventory.html")).
So with this assertion, we’re just going to assert that our URL contains "inventory.html". We’re going to check that this statement is true.
The reason why I didn’t want to put the whole URL in there, because I don’t like to tie it into an environment, right?
Because if you’re using [inaudible] this part might be different that’s changing so you don’t want to tie that.
But if it contains "inventory.html" in the URL, that is sufficient enough for me to know that we are on the correct page.
So let’s give this a run and see what happens.
Success!!
Our test is passing which is amazing.
One other recommendation I like to make, which whenever we’re doing test automation, especially with UI, we don’t always do is, make sure your test will actually fail.
So if I do something like this, our test should fail.

You can see that it says our assertion failed. Perfect!
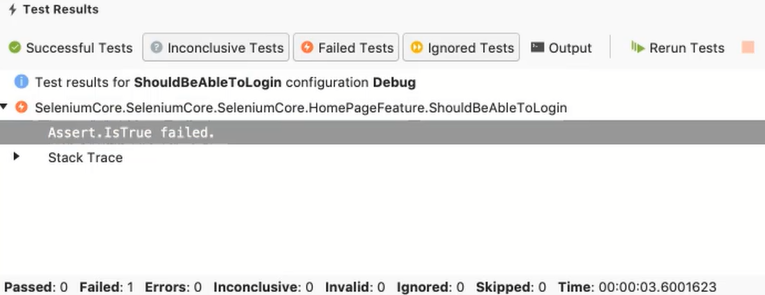
So this test works as expected.
Congratulations, you’ve just written your very first automated Selenium test using .NET Core in Visual Studio.
Give yourself a pat on the back. You certainly deserve it.
Conclusions
All right, my little automation grasshopper. Our journey ends here!
Although I’ve gotten you started, you still have a long, long way to go. There is so much to learn in terms of Selenium WebDriver and test automation, in general.
As I’ve said, many people have made careers out of it, such as myself, doing it and teaching it.
You’ve got to learn page objects, you’ve got to learn Docker containers. Also, you’ve got to learn Selenium grids. You’ve got to learn parallelization and so much more.
So, I don’t want to leave you empty-handed, and I want to help you to further proceed.
A lot of people like to practice their test automation, and you can grab this URL right here for dummy automation websites. You can go there.
I have a massive list of automation websites where you can go and practice different kinds of skills.
Also, if you want to continue your learning with Selenium WebDriver in C#, I do have a full course on that.
I have an entire course that covers everything in depth. At the end you’ll be able to actually write your own automation framework using all the best practices.
Then, if you want to proceed in other programming languages and further master your skills in Selenium automation, I’ve provided you a link to my favorite Selenium courses.
They’re all in different programming languages from Java to Python or Ruby, and all different kinds of flavors. Even mobile automation is in there.
Take a look there if you’re interested. These are great places to get you started and get you expanding your skills.
I just wanted to say thank you so much for taking time out of your day to listen to me teaching you Selenium WebDriver with .NET Core.
It’s been a true pleasure. I always appreciate you, and I will certainly see you in the future.
Have an amazing day!
If you like this post, leave a comment below right now!
Also, if you feel like you have missed something, why don’t you take a step back and take a look at the first part of this intro right here ?!