
What is webdriverIO?
Webdriver IO is a Node.js automation framework that uses WebDriver W3C protocol for web and mobile automation under the hood. What makes it really awesome is the easy setup and the simple interface that exists to interact with your applications.
If you want to learn why Webdriver IO rocks, take a read here.
WebdriverIO Test Runner
This is the most popular way of using webdriverIO.
The test runner is basically a framework that makes test automation much easier. For example, here are some of the inherent advantages of using the test runner:
- Extra hooks: Hooks will allow you the capability to perform actions before and after the execution of tests.
- Default async/await usage: WebDriver commands are asynchronous by nature. As a result, every command will require an
awaitbefore it. Which can be a little repetitive and annoying. The test runner handles this for you so that you don’t need to worry about it. - Suites: Suites allow you to separate different sections of your test suite so that you can run them individually.
- Parallel test runs: Parallelization is the most powerful way to speed up your suite execution. Besides that, parallelization is mandatory to any test automation program.
- Automatic session deletion: Normally you have to do something like this in your tests
await browser.deleteSession();But, the test runner takes care of that part for us.
WebdriverIO test runner tutorial
This is the one the version that you want to use. It comes with everything you need out of the box. There’s also webdriverio standalone that you can use but I don’t feel like it has much use.
How to get started
Official docs are here
1.Create a new directory and navigate to that directory
mkdir wdio-testrunner && cd wdio-testrunner
2.Initialize a new NPM project with npm init -y . This will create a package.json file
If you don’t do this, when you go to do npm install no packages will actually be installed.
3. Install the command line interface npm install @wdio/cli. All the official WebdriverIO packages are namespaced under the @wdio scope
If you encounter any permissions errors here, you can try:
sudo npm i --save-dev @wdio/cli --unsafe-perm=true --allow-root
Or just set this globally for npm and it will stop complaining:
npm config set unsafe-perm trueThe CLI tool is a wrapper around the main webdriverIO functionality, we will work through the CLI.
Since @wdio/cli is a command-line utility, it’s setup to install to a special .bin folder inside our node_modules directory. This gives us two ways to run the utility:$ ./node_modules/.bin/wdio
or $ npx wdio
4. Let’s configure webdriverIO using npx wdio
Answer the questions
- Where should your tests be launched?
Enter - Shall I install the runner plugin for you?
Y - Where is your automation backend located? For now, our tests will execute on our local machine through our selenium server
- Which framework do you want to use?
mocha - Shall I install the framework adapter for you?
Y. This will install our framework that we would like to use. - Do you want to run WebdriverIO commands synchronous or asynchronous?
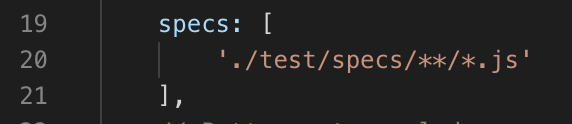
sync. This will make sure that you don’t have to keep usingasyncwith every command - Where are your test specs located? (./test/specs/*/.js)?
Enter - Which reporter do you want to use?
spec. We will keep things simple for now. - Do you want to add a service to your test setup?
selenium-standalone. Make sure that you press theSpacekey to select one or more options. PressEnterafter you are done. - Level of logging verbosity:
Info - What is the base url? Enter the base url of your website
I’d like to bring to your attention that the ** and * in the path is called a Glob pattern. That’s a convention used to define where multiple files are at.
The ** section says to look in all the sub-folders for files, if we later organize our tests by feature (say we add a login or checkout folder) WebdriverIO will know to look in those subfolders as well as the main test/specs folder.
The * portion in *.js matches any file that ends with a .js extension. It will match test.js and login.js but not test.txt or just login.
Create and run your first Webdriver IO test
1.Create a new folder for our tests mkdir -p ./test/specs
First, when we setup the webdriverIO test runner, we specified the location of all of tests in the wdio.conf.js. So, any tests that we put inside the spec folder will be executed. This is the configuration in the file.
Now we have the folder for our tests. Let’s actually add a test:
2. Using command line, create a new file touch ./test/specs/example.js
3. Add this code to the example.js file
4. Run the test using npx wdio or ./node_modules/.bin/wdio
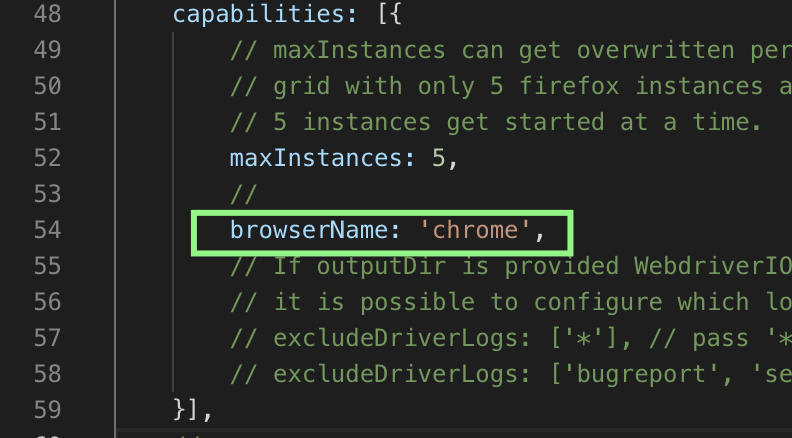
Note: Make sure that you have the appropriate browser installed. In the previous examples, we installed Chrome. Hence, if that’s what you have then set that in the wdio.conf.js because the default is Firefox.
Different ways to run tests
The wdio command
wdio [options] [configFile]There are three parts. First, the wdio command. Then any number of options. And finally, an optional path to a configuration file.
How to run tests in a single file
This will run a single test from the login.spec.js using the config wdio.android.rdc.conf.js
./node_modules/.bin/wdio ./tests/e2e/config/wdio.android.rdc.conf.js --spec=login.spec.jsYou can also do something like this and add logging, or any number of other options
./node_modules/.bin/wdio ./tests/e2e/config/wdio.android.rdc.conf.js --spec=login.spec.js --logLevel=trace
WebdriverIO QuickStart
- Clone this repo
- Install dependencies using
npm install - Run tests
npx wdio
wdio.conf.js
This is the file that controls all of the configurations for webdriver io.
How to point wdio.conf.js to a test file
wdio location vs test file
| wdio.conf.js location | test file location | specs path to set in wdio.conf.js |
|---|---|---|
| root | test/e2e/specs/login.spec.js | './test/e2e/specs/*.spec.js' |
Cool WebdriverIO features
- Interactions with elements with only a single command: This means that to click an element, you simple have to use this command
browser.click('element locator'). This will also find the element and then click it if it’s found. This is actually two web requests for a single method call.
Command line options
Dynamic URLs
You can dynamically set your application URL through command line. Or any other variable of course.
SERVER=prod ./node_modules/.bin/wdio --logLevel=traceRun tests in a single file
Use –spec=your.spec.name.js
This will run a single test from the login.spec.js using the config wdio.android.rdc.conf.js
./node_modules/.bin/wdio ./tests/e2e/config/wdio.android.rdc.conf.js --spec=login.spec.jsYou can even do the same thing with yarn to run an NPM script
//yarn <npm script> <your spec>
yarn ios.rdc --spec=swag.row.overview.spec.js
NPM scripts
Using these scripts, we can make testing easier.
For example, we can update package.json
To look like this:
And now we can run the tests like this npm test wdio
If you want to add command line parameters to the scripts, you need to prefix them with -- like this npm test -- --logLevel=info
However, if you want to change environment variables, do just like before:
SERVER=prod npm test -- --logLevel=trace
How to run cross-platform with webdriver io?
Add this to your wdio.conf.js
config.capabilities = [
    {
        browserName: 'googlechrome',
        browserVersion: 'latest',
        platformName: 'Windows 10',
        'sauce:options': {
            ...defaultBrowserSauceOptions,
        },
        ...chromeOptions,
    },
    {
        browserName: 'firefox',
        browserVersion: 'latest',
        platformName: 'Windows 10',
        'sauce:options': {
            ...defaultBrowserSauceOptions,
        },
    }
CucumberJS + Webdriverio
One of the biggest pains in my butt has been Cucumber for test automation. It simply makes life for automation engineers so much harder.
Regardless, here are my notes on how to use it:
How to run a single Cucumber feature file
You can use the code from this repo for webdriverio v4 implementation.
npx wdio ./tests/config/wdio.conf.js --spec ./tests/features/search.web.featureDebugging WebdriverIO tests
You can add a browser.debug(); command anywhere in your test code and the execution will stop there.
At some point, the debug point will time out so that our test isn’t hanging for too long. In debugging of course, we want to have this timeout be longer…
We can change that and it’s based on the testing framework that you are using.
Mocha API
Here’s the Mocha API
We can update the timeout either using the mocha.opts file or via command line.
For WebriverIO, the settings are actually in the wdio.conf.js file. So we can just change them there. The timeout setting is in ms.
You can imagine that it’s a bit annoying to keep changing these values. Especially, when you forget to change it back in production, potentially leaving your tests to hang.
There’s documentation on how to do this dynamically from WebdriverIO here.
Here’s an example of how to do this:
Now you can set the timeout using command line and use the longer option DEBUG=true npx wdio
My questions
- Changing to this
import { notStrictEqual } from 'assert';from thisconst assert = require('assert');doesn’t work for some reason when I runnpx test. - How to download some source code and start working with it.
WebdriverIO standalone tutorial
Honestly, I’m not really sure on the point of the standalone implementation of WebdriverIO. I learned it and then never used it.
You might just want to ignore this documentation. But if you need it, it’s here.
How to install WebdriverIO
- Make a directory
mkdir wdio-standalone - Navigate to the new directory
cd wdio-standalone - Initialize the project as an NPM project with
npm init -y. This will create a package.json file. - Install WebdriverIO with
npm install webdriverio. This will install all of the packages that are relevant for WebdriverIO. Note: Installing WebdriverIO via the command line doesn’t give you all of the NPM packages that you need. We do get a Node.js module. - Create a new file with
touch test.js - Open the file and let’s add some code to it
Next, we’ll need to install Selenium Server…
How to install selenium-standalone
Pre-requisites:
- Java installed
- Java JDK installed
1. Run command sudo npm i -g selenium-standalone
2. Install the resources from the server sudo selenium-standalone install
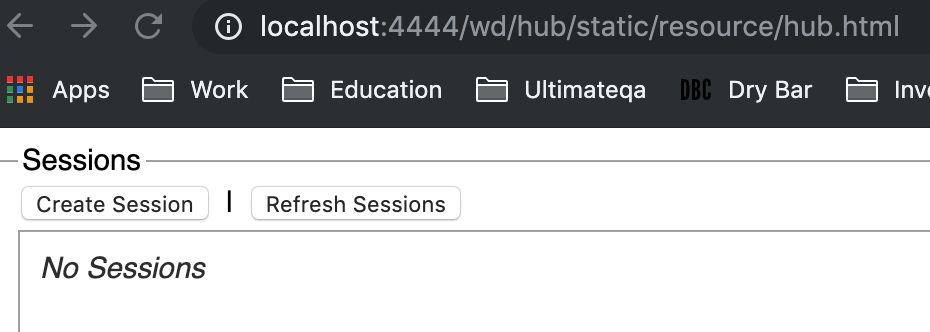
3. To start the server, you can run selenium-standalone start. Make sure to do this in a separate Terminal window
You know that you succeeded if you can hit this URL: http://localhost:4444/wd : and see something like this.
How to run webdriverIO test with selenium-standalone?
1. In your terminal with wdio-standalone installed, run node test.js. This will tell Node.js to run the test.js file.
If successful, you will see a chrome browser come up quickly and you will see some commands logged that look like this

How to run webdriverIO with chromedriver?
Chromedriver uses port 9515 to listen for commands to come through. That’s a bit different from Selenium server that runs on port 4444.
This is the default configuration that runs on selenium server.
To update it to use chromedriver, change the configuration to this:
Now, you will want to install and run chromedriver below…
How to install and run chromedriver
1.Open terminal and run npm install -g chromedriver
Note: You might run into some errors here like Missing write access or Chromedriver installation failed. Follow those links for solutions.
2. Run chromedriver in a separate terminal window by running chromedriver command. This is what success looks like:

You can also hit http://localhost:9515/ and make sure that you get back a response. That will tell you if chromedriver is running or not.
How to run a webdriverIO test on chromedriver?
1.Once you have chromedriver running with the chromedriver command
2.Execute node test.js to run your tests on Chrome
Learn WebdriverIO Course
Pre-requisites
- Install NodeJS
1. Clone this repo
2. Navigate to the directory of the repo cd webdriver-io-course-content
3. Run npm install to download all of the dependencies
4. Run npm start which will start the application on your local environment
5. Go to one of the URLs to see the website running
Common errors
Click() is not a function…
The solution
//Delete the node modules folder
rm -rf node_modules/
//reinstall node modules using yarn or npm
yarn
Missing write access to /usr/local/lib/node_modules…
npm WARN checkPermissions Missing write access to /usr/local/lib/node_modules
 npm ERR! path /usr/local/lib/node_modules
 npm ERR! code EACCES
 npm ERR! errno -13
 npm ERR! syscall access
 npm ERR! Error: EACCES: permission denied, access '/usr/local/lib/node_modules'
 npm ERR!  { [Error: EACCES: permission denied, access '/usr/local/lib/node_modules']
 npm ERR!   stack:
 npm ERR!    'Error: EACCES: permission denied, access \'/usr/local/lib/node_modules\'',
 npm ERR!   errno: -13,
 npm ERR!   code: 'EACCES',
 npm ERR!   syscall: 'access',
 npm ERR!   path: '/usr/local/lib/node_modules' }
 npm ERR!
 npm ERR! The operation was rejected by your operating system.
 npm ERR! It is likely you do not have the permissions to access this file as the current user
 npm ERR!
 npm ERR! If you believe this might be a permissions issue, please double-check the
 npm ERR! permissions of the file and its containing directories, or try running
 npm ERR! the command again as root/Administrator (though this is not recommended).
 npm ERR! A complete log of this run can be found in:
 npm ERR!     /Users/nikolay/.npm/_logs/2019-04-14T14_28_32_628Z-debug.log
The solution
This is an issue with write permissions to your disk. If you see these kinds of errors, simply run the command with sudo.
sudo npm install -g chromedriver
ChromeDriver installation failed { Error: EACCES: permission denied …
ChromeDriver installation failed { Error: EACCES: permission denied, mkdir '/usr/local/lib/node_modules/chromedriver/lib/chromedriver'
     at Object.mkdirSync (fs.js:753:3)
     at /usr/local/lib/node_modules/chromedriver/install.js:282:10
   errno: -13,
   syscall: 'mkdir',
   code: 'EACCES',
   path: '/usr/local/lib/node_modules/chromedriver/lib/chromedriver' }
 npm ERR! code ELIFECYCLE
 npm ERR! errno 1
 npm ERR! chromedriver@2.46.0 install: node install.js npm ERR! Exit status 1 npm ERR! npm ERR! Failed at the chromedriver@2.46.0 install script. npm ERR! This is probably not a problem with npm. There is likely additional logging output above. npm ERR! A complete log of this run can be found in: npm ERR! /Users/nikolay/.npm/_logs/2019-04-14T14_31_21_148Z-debug.log
The solution
Run this command instead that I got from here:
sudo npm i -g chromedriver --unsafe-perm=true --allow-root
Resources
- Amazing exercise walkthrough of webdriverIO and many features by Christian
- Boilerplate projects (most of which don’t work)
- JS nodeJS course on Udemy
- WebdriverIO course by Kevin Lamping
- Web App Testing Guidebook for WebdriverIO by Kevin Lamping
- Clone this repository that has some sample working tests
- You can run tests in Sauce Labs by running this command
npm run wdio wdio.sauce.conf.js
The package.json file has this configuration that tells us which commands to execute for which scenario. If we want to run on Sauce Labs, the command we use is the one below:
Trackbacks/Pingbacks